Sunday, October 22, 2017

Your Next Stamp October Feature Day Card Video

Hello fellow card makers.

Today I am sharing a card I made for Your Next Stamp Feature Day. We were told to make something around the theme "Magical". This was actually a struggle for me. I finally came up with the idea to use some "Magical" card making techniques to create my card. To check out what the rest of the design team created (CLICK HERE!) to visit the Your Next Stamp Blog. Comment on the Your Next Stamp blog for your chance to win a stamp set of your choice.

I started with a piece of Neenah Solar White 80lb. cardstock. I used my Cricut Bright Pad and the packaging the the Hobby Chicks stamp set comes in to trace my "guy" birdie. I took the girl image and traced only the parts that would make my "guy" face her when stamp beside him and look like a boy, not a girl. I first traced it with a drawing pencil and then I went over it with a Copic Multi liner. I then stamped the girl version like normal right next to him in Your Next Stamp Black Olive Ink.

I then masked the images with the Molotow Masking Pen. I also masked off the ground and sky with masking paper tape in order to ink blend my background. I used Versamagic Sea Breeze and Key Lime for the ground and sky. The entire panel was cut down with the second to largest Your Next Stamp Stitched Rectangle Die.

Once the image and background were completed. I used the Cricut Bright Pad and a cutting mat to line up my Your Next Stamp Bold Alpha dies to cut out DANCE from my image. I also cut out DANCE from white craft foam. SAVE ALL YOUR pieces. The video linked below will show this technique in greater detail. I then used typing paper to create a backing to my letters. Cover it with adhesive and stick it to the back of the card panel. Use the adhesive to stick down first your craft foam letters and then your card stock letters.

I stamped the sub sentiment with Versamark Ink and white heat embossed it with Hero Arts Ultra fine white embossing powder. The panel was attached to a piece of white craft foam and popped up on the Simon Says Stamp Fog card base with 1/2" scor tape. The sub sentiment was popped up with 3M foam tape.

To finish off the card, I added Pretty Pink Posh Sparkling Clear Sequins and Spectrum Noir Clear Glitter pen to her bow and tutu. I also added glossy accents to both of their beaks.

For photos of my card, a link to the YouTube video I made creating this card, and links to all the supplies used to make it, look below. Don't forget to check out the rest of the design team's projects over at The Your Next Stamp Blog (CLICK HERE!) and comment over there to have a chance to win a stamp set of your choice.

Thank you for visiting my blog today,

Koren


SaveSave

Friday, October 20, 2017

Your Next Stamp Challenge #75

Hello fellow card makers.

Today I am sharing my card for Your Next Stamp's Challenge #75. This is a biweekly sketch and/or color challenge. I have used the color combination for my project today. It's a very nice fall-inspired photo with wonderful autumn colors. I've used all of the colors on my card. Here is a look at this week's sketch and color combo. To play along,  for more information,or to see the rest of the design team's inspiring projects (CLICK HERE!) to go to the Your Next Stamp Blog.


As for my card, I used the Your Next Stamp Halloween Pumpkins stamp set as well as a sentiment from Fangtastic Halloween. I started with a piece of Tim Holtz watercolor cardstock. I cut it down with the second-to-largest Stitched Rectangle dies. I then measured 1/2 inch from each edge to mask off a rectangle. You can look below for a link to the YouTube video I created while making this card. It might be better at explaining things. I ink blended a gray sky and green grass background using Distress inks in Hickory Smoke, Twisted Citron, and Mowed Lawn. The Hickory Smoke Distress Ink  gives a good variation of color on it's own. The Twisted Citron is a great color, but when blended, can sometimes look a little flat on it's own. So, to fix that, I added the Mowed Lawn to give a little more depth.

I stamped the images using Your Next Stamp Black Olive Ink, which is Copic friendly. I masked them and arranged them in a cluster. I colored them with my Copic markers and used my Scan N Cut to cut out my masked and stamped cluster of images. I popped them up onto my background with 3M foam tape.

I stamped my sentiment from Fangtastic Halloween with Versafine Onyx Black ink onto Papertrey Ink's Orange Zest cardstock. I used an MFT stitched sentiment die to cut it out. I then popped it up with 3M foam tape onto my background.

For photos of my card, a link to my YouTube video making this card, and links to the products used to create this card, look below.

Thank you for visiting my blog today, I hope you will consider playing along with us at the Your Next Stamp blog (CLICK HERE!),

Koren


Wednesday, October 11, 2017

Your Next Stamp DT Dare Be Merry Card Video

Hello fellow card makers.

Today I am sharing the card I made for the latest Your Next Stamp Design Team Dare. We were told to "Be Merry" and so I was! To see the rest of the Design Team's creations (CLICK HERE!) to visit the Your Next Stamp Blog.

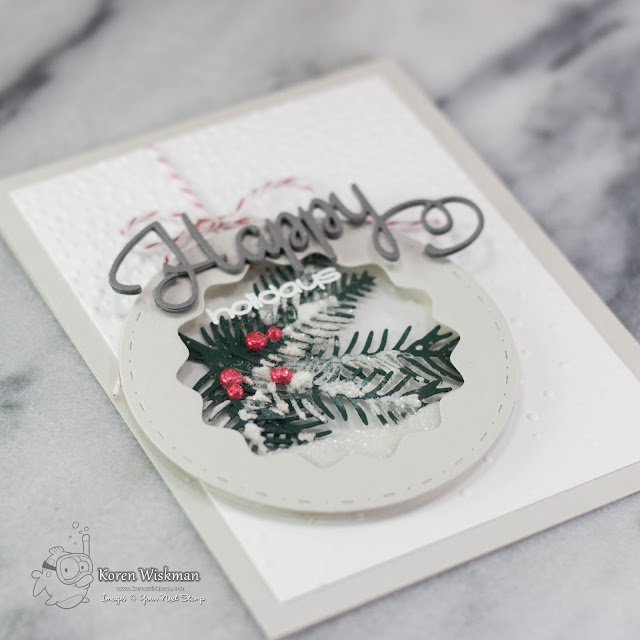
I used the new Pine Tree Branch Die and the new Wonky Circle Sizes die set. I also used a few older favorites like the Happy die, and the Happy Everything Stamp set. A more complete list of supplies with links will be listed below.

I started with an A2 sized top folding card base in Simon Says Stamp Fog cardstock. I cut a piece of Neenah Solar White 110lb cardstock down to 3 3/4 x 5 and embossed it using the Stampin' Up! Falling snow embossing folder.

I then used the second largest Wonky Circle Sizes die and the third largest Stitched and Pierced Circle die to create my ornament (also from Fog cardstock). I created a clear shaker using Crafters Companion acetate sheets and 3M foam tape. Inside the shaker are Pine Tree Branches and Distress Rock Candy Glitter. I added red berries with Liquid Pearls Ruby Red. I added snow to the pine branches with Marvy Snow Pen.

The Happy die sentiment is cut from Taylored Expressions Earl Gray cardstock layered four times with Ranger Multi Medium Matte adhesive. The holidays sub-sentiment is heat embossed on the front of the acetate ornament with Versamark and Hero Arts Ultra Fine embossing powder.

To finish off the card, I hung my ornament with Stampin' Up! red and white twine and adhered the shaker portion directly to the embossed background with tape runner adhesive. I tied a bow, and called it finished.

To see photos of my card, a link to the YouTube video I made while creating this card, and links to the supplies used, look below.

Thank you for visiting my blog today,

Koren


Saturday, October 7, 2017

Your Next Stamp October Blog Hop Card Video

Hello fellow card makers.

Welcome to Your Next Stamp's October new release blog hop. This release is packed-full of fun holiday stamps and dies. My favorite in this release has to be the Periodically Nerdy stamp set. It allows you to create words out of stamps created to look like elements from the periodic table. To check out the entire new release once it is available online (CLICK HERE!) to visit the Your Next Stamp online store. This link will take you right to the new products page in the store.


While you are hopping along, don't forget to comment on each stop to increase your chances of winning a $25 gift certificate to the Your Next Stamp online store. The more blogs you comment on, the better chance you have of winning. Also, Your Next Stamp is having a 20% off sale, use the coupon code below.


I have two projects for you today. So remember to scroll down to check out my second project.

The first project today is a card I made with my favorite stamp set of the release, Periodically Nerdy. I used it to white heat emboss the sentiment on vellum. I tried to make it say "happy holideer" or something of that nature, because I used the dancing deer from the brand new Be Jolly stamp set. I stamped him out and colored him with my Copic markers. I used the coordinating dies to cut him out. I popped him up the the card with some 3M foam tape. The patterned paper you see on this card is from the new Holiday Joy paper pad, also in this release.

I used Your Next Stamp's Ripped Rectangles to cut out my elements sentiment. I used multi-medium matte to adhere the vellum to the card base. I used a little too much as it is visible as little wet dots under the vellum, but it didn't bother me enough to start over.

Photos of my card, a link to my YouTube video making this card, and a full list of supplies (other than new release items) are listed below. Now for my next card project.


I was really happy the way that this card came out. I used the brand new Pine Tree Leaves Die and Jingle Bells stamp set and coordinating dies to create this card. 

I started with a medium gray cardstock panel cut slightly smaller than an A2 size top folding card. I used Taylored Expressions Earl Gray cardstock. I then cut out my first Pine Tree Leaves die with Neenah Solar White 110lb cardstock. This die is pretty intricate, I broke out my wafer thin die cutting plate by Sizzix to help me cut it out completely. I cut the rest of my Pine Tree Leaves from Earl Gray cardstock as well. I adhered them all flat to the card front with Ranger Multi-medium matte. I put a heavy acrylic block on them and waited a few mins for them to dry completely. I cut off any overhanging parts from my card panel. 

I white heat embossed my sentiment from the Jingle Bells sentiment as well as the bells from the same set. I stamped them on vellum and used Simon Says Stamps detail white embossing powder. I used their coordinating dies to cut them out. 

The sentiment was popped up with 3M foam tape. I used some white twine I have in my stash to tie a bow atop the bells. I then adhered it to the white leaves with liquid adhesive. The entire front panel is popped up with white craft foam. 

Photos of my card and links to products I used to make this card are listed below.

Thank you for visiting my blog today. Don't forget to hop along with us and comment for your chance to win a $25 gift certificate to the Your Next Stamp online store. To see all the new products (CLICK HERE!) to visit the new products page. 


Your Next Stamp October Preview Day Card Video

Hello fellow card makers.

Welcome to Your Next Stamp October Release Preview Day! I have a fun project for you today. I am using the brand new Be Jolly stamp set and coordinating dies for my project. To see what the other Design Team members and guest designers have made, visit the Your Next Stamp Blog or (CLICK HERE!). To see all the new release products once they go live on Oct. 7th, (CLICK HERE!) to go to  the new products page in the Your Next Stamp online store. We will be having our new release blog hop tonight at 10 PM EST.


I started out wanting to use the Santa image that looks like he is popping out of a present. So, I stamped him with Your Next Stamp black olive ink and colored him with Copic Markers. I also stamped him on some patterned paper and some Neenah Desert Storm cardstock. I needed to paper piece some of the elements of the image. The under pieces of the paper and the area behind Santa. I was hoping to make it more realistic that way. For more details, click on the link below, that will take you to the YouTube video I made making this card.

I then used the Party Dress die set bow, the largest bow, to create a gift out of my card front. I cut strips of paper to act as ribbon. I popped up my image and sentiment with 3M foam tape and called it a day.

Photos of my project, a link to my YouTube video, and links to supplies used are listed below.

Thank you for visiting my blog today. Don't forget about the Blog hop tonight at 10pm EST.

Koren


Friday, October 6, 2017

Your Next Stamp Challenge #74 Card Video

Hello fellow card makers.

Today I am sharing a card with you that I made for the Your Next Stamp Challenge #74. It is a biweekly challenge over on the Your Next Stamp Blog (CLICK HERE!) to visit the blog and play along. Here is a look at this week's sketch and color combination.


I started with a piece of Strathmore Bristol Smooth White cardstock. I used Versafine Onyx Black ink to stamp the Batty Splatter Background stamp and the haunted house from Halloween Phoebe and clear heat embossed it with Stampin' Up! Clear embossing powder. I then ink blended some Distress ink on the background in Wilted Violet. I added a moon with a Creative Memories circle punch and some label paper in Pumice Stone. I cut down the panel with the second from largest Stitched Rectangles die. I then inlaid a smaller die from the same set in the center of the panel.

I stamped Halloween Phoebe with Your Next Stamp Black Olive ink and colored her with Copic Markers. I have a Copic marker color map below if you are interested in which markers I used. I popped her up with 3M foam tape.

I stamped the sentiment with Versamark ink and white heat embossed it with Simon Says Stamp Detail White embossing powder. I cut it out with one of the smaller dies from the Stitched Rectangles die set and popped it up with 3M foam tape in the center of the card.

I finished it off by adding some Your Next Stamp Milk and Cookies Matte Gumdrops to the front and I adhered the panel to a Simon Says Stamp Fog card base.

Photos of my project, a Copic marker color map, a link to the YouTube video for this card, and a list of supplies used are listed below.

Thank you for visiting my blog today. I hope you will come play along in the challenge (CLICK HERE!).

Koren