Monday, December 2, 2019

Scrapbook.com Holiday Deal Insider


Hello everyone. It's Cyber Monday and today I have a super simple card for you, and one awesome deal... Scrapbook.com is offering Freebies and today's freebie is a 6 pack of Distress Crayons! Free! Yup! Free!

To shop Scrapbook.com (CLICK HERE!) to go to the online store. Don't forget they also have a large community of creators that add projects daily for inspiration using products that are sold at Scrapbook.com

For my project today, I happen to have some pre-embossed panels that I had in my stash but you could use virtually any background by heat embossing your own. I cut my panel to 3 1/2 by 4 3/4 and popped it up onto a neutral gray card base cut to size A2 and scored in a top folding portrait orientation. I used craft foam cut slightly smaller than the panel itself and tear tape adhesive to attached it.

I used another embossed panel and my Distress Crayons to watercolor a very simple, two color combination and bring out the white vines of the embossed pattern.


I then used my Altenew Bold Alphabet dies to cut the word "joy" for the front of the card. I cut the letters from both the watercolor piece and also from three additional plain white cardstock pieces. I layered them all together using Nuvo Deluxe liquid adhesive and then placed them on the card panel justifying to the upper center.

The sub sentiment was stamped using sticky embossing ink and heat embossed using Ranger White embossing powder onto a piece of Lawn Fawn Black Licorice Cardstock. I used my Fiskars wire guide paper trimmer to cut it into a small sentiment strip and attached it to the panel using Ranger Letter It Clear Foam Adhesive.

Thank you so much for visiting my blog today. I hope I've inspired you to create something today. Don't forget to check out all of the amazing deals that Scrapbook.com has this holiday season. Including all of the free with purchase deals coming soon.

Koren

Wednesday, November 27, 2019

Heffy Doodle 25 Days of Christmas Tags


Hello everyone.

Today I have a fun Christmas tag for you using Heffy Doodle products. We at Heffy Doodle are participating in the 25 Days of Christmas Tags today. (CLICK HERE!) for more information and inspiration for holiday themed tags. Each day there is a different company sponsor and a ton of inspiration comes too.


I started with the Heffy Doodle Tag A Long die set and some Neenah 110 lb. Solar White cardstock. I cut the fun tag out from the heavy weight white cardstock with my Spellbinders Platinum Die Cutting Machine.  I also cut the background from Papertrey Inks Hawaiian Shores cardstock.

I then took the same background die from the Tag A Long die set and the Heffy Doodle Slopey Joes die set and cut two strips of Lawn Fawn Pixie Dust Glitter cardstock. I made sure that I was leaving enough room to stamp a sentiment above my landscape as well as ensure enough room for all of my trees and presents I was about to cut out.

I stamped my images from Heffy Doodle's Santa's Village stamp set as well as the Wanna Build A Snowman stamp set with Simon Says Stamp Intense Black ink onto the same Neenah 110 lb. cardstock. I colored my images today with my Copic Markers. I have them listed in a pin-able Copic Color Map. I like to save them to my Copic Pinterest Board and it helps me keep track of color combinations. I used the coordinating dies of both sets to cut them out.


For the sentiment, I stamped the "winter wishes" from the Wanna build A Snowman set onto the teal background using Nuvo Clear Mark embossing ink. I also stamped the "sending you our warmest" from the same set onto My Favorite Things Black Licorice cardstock also with clear ink. I heat embossed both sentiments using Ranger White embossing powder and my Wagner Heat Tool. I cut down the sentiment strip using my Fiskars wire guide paper trimmer.

Once all of the main elements of the tag were created, I could then start to put it together. The tag itself is very easy to put together. This tag can also easily be made as a shaker tag. This time I just adhered most of the Tag A Long dies together using Nuvo Deluxe Liquid Adhesive. I put some Scotch 3m Foam tape to pop up one of the layers of glitter paper for the ground and I started to either adhere flat or pop up with foam tape all of the images you see on the tag.


To finish off my tag I needed to add some ribbon and twine. I decided to match the vibrant pink I used on the images. I have had most of my ribbon for a long time. You can no longer purchase the exact ribbon I used but I linked a fine alternative below for you to check out. I also added some black and white twine to coordinate with the black and white sentiment.

I hope I've inspired you to create something handmade today. Make sure you (CLICK HERE!) to visit the latest 25 Days of Christmas Tags blog post that Tracey organizes.

Thank you so much for visiting my blog today.

Koren

Friday, November 22, 2019

Neat & Tangled November Release Week: Recap


Hello everyone.

I hope you had a good time this week checking out the NEW Neat & Tangled November release. I know I had a great time playing with these NEW products. I hope I've inspired you to create some handmade Christmas cards this holiday season.

To check out the entire November Release (CLICK HERE!) The winners for this week's giveaways will be announced today over on the Neat & Tangled blog.

The best way to shop the NEW release is to buy the bundle and save money. You will find links to all the NEW products below.

Thank you so much for visiting my blog today.

Koren


Thursday, November 21, 2019

Neat & Tangled November Release Week: Day Four and 25 Tags of Christmas


Hello everyone.

Today is Day Four of Neat & Tangled's November release week and we have a special treat today. The Design Team is also participating in the 25 Tags of Christmas event, more information can be found on the Neat & Tangled Blog. (CLICK HERE!).

To check out the entire NEW November Release from Neat & Tangled (CLICK HERE!) to visit the online store to shop or the blog for more inspiration from the design team. Also, don't forget to comment here and over on the N&T blog for your chance to win today's giveaway. Giveaway winners will be announced on Friday over on the N&T blog.


To create my tag today I started with a piece of Neenah 110 lb. Solar White Classic Crest cardstock. I used an older tag die from Neat & Tangled but honestly, it's my favorite tag die. It's the Classic Tag 1 die and I will cherish it forever. To make this work, I first stamped the Holiday Wishes Background stamp onto a piece of Neenah that was cut to 4 1/4 by 5 1/2 inches. I used Simon Says Stamp Fog gray ink like I have a million times before, because I like it. I absolutely love this background stamp. The font is perfect and I personally love text backgrounds. The tag was then cut out trying to align the text as straight as possible with the die.


The image of the little kid in the snowman costume is from last year's Christmas Pageant stamp set also by Neat & Tangled. I stamped him with Simon Says Stamp Intense black ink and colored him with my Copic Markers. I made a Copic color map for you guys (below), although it was rather simple coloring. 

For the sentiment, I stamped the "happy holidays" from the Classic Christmas stamp set from this November's NEW release with Nuvo Clear Mark embossing ink and heat embossed it with Ranger White embossing powder. I cut it down into a strip and to change it up a little, I trimmed off one end in a diagonal and had it slightly off the tag. It was popped up onto the tag using Scotch 3M foam tape. 

I added some of the Neat & Tangled Clear Mix sequins coming from behind my image. I feel like this makes it feel a little frozen, lol. I used micro Glue Dots to adhere the sequins in place. 


For the trimmings at the top, I cut a few lengths of red twine, as well as black and white twine. I also cut some black sequined twine. I first added the black and white twin and kept it rather long in length then I added the black sequined twine and cut it much shorter. Then I finished it off by tying the red twine around it all into a pretty bow.

I hope that I've inspired to to create some homemade Christmas tags. If you want to check out more inspiration from the rest of the design team (CLICK HERE!) to both shop and read the blog.

Thank you so much for visiting my blog today.

Koren

Wednesday, November 20, 2019

Neat & Tangled November Release Week: Day Three


Hello everyone.

Today is Day Three of Neat & Tangled's November release week. Today I made a card inspired by my husband Tim. He doesn't often chime in and give me direction on how to make a card, but today he decided to speak up, so I listened. As soon as he saw the Classic Christmas stamp set by Neat & Tangled he said that I should "do a green background" with "gold heat embossing", so I did.

To check out the enitre November release from Neat & Tangled (CLICK HERE!) to visit the shop and blog for more inspiration. Don't forget to comment here and over on the N&T blog for your chance to win today's giveaway. Giveaway winners will be announced on Friday on the N&T blog.

For my card today I started with a Stampin' Up! Garden Green piece of cardstock and cut it to 3 1/2 by 4 3/4 inches. I grabbed my Distress Oxide ink in Pine Needles and my Nuvo Blending brushes and blended on a little bit of darker green on the outside edges of the background, and looking back on it, I wish I had done another layer of even darker color to make it more dramatic. But I do like the way it preserves the true green of the cardstock in the center behind the images and sentiment.

I stamped two poinsettia images from the Classic Christmas stamp set with Simon Says Stamp Intense Black ink and colored them with my Copic Markers. I did this because I have been warned that coloring with your alcohol markers onto a heat embossed image can ruin your nib. So I avoid doing that. After the images were colored however I put it back into my MISTI where I left the stamp in it's original position and re-stamped the image again using Nuvo Clear Mark embossing ink. This time I also heat embossed it using Nuvo Gold Enchantment embossing powder. I also added some sticky ink to the centers of the flower and added a ton of the glitter embossing powder in that area to make it super shiny and glittery in the center.

The two flowers were adhered with Nuvo Deluxe Liquid adhesive flat to the ink blended background panel. Some of the leaves were hanging off of the edge of the cardstock but still within the confines of the card itself. The entire panel was then added to a Simon Says Stamp Fog card base cut to size A2 and scored in a top folding portrait orientation. The panel was adhered using large strips of foam tape to give it dimension.


I still needed a sentiment for the card so I cut a strip from the Neat & Tangled Skinny Strips dies that fit perfectly across my card panel. I put it into my MISTI along with the " sending you cheer" sentiment from the Classic Christmas stamp set in this months release. I stamped it using the same sticky ink and heat embossed it to match the rest of the gold on the card. The strip was then popped up using very thin strips of Scotch 3M foam tape.

Tim loved how the card turned out and I am going to give it to him to give to someone special in his life, besides me of course : )

To check out more inspiration using the Neat & Tangled November release (CLICK HERE!) to visit the online store and blog.

Thank you for visiting my blog today.

Koren


Tuesday, November 19, 2019

Neat & Tangled November Release Week: Day Two


Hello everyone.

It's Day Two of Neat & Tangled's November Release week. Today I created a Christmas card using the products from the NEW November release as well as the shiny black enamel dots from a previous release.

The Neat & Tangled November Release features a poinsettia in the Classic Christmas stamp set as well as beautiful accent foliage to coordinate with it. To check out this set as well as the entire November release (CLICK HERE!) to visit the online store and blog. Make sure you comment here and over there for your chance to win today's giveaway. Giveaway winners will be announced this Friday on the Neat & Tangled Blog.

I started my card with a piece of Neenah 110 lb. cardstock cut to 4 1/4 by 5 1/2. I loaded it as well as the Holiday Wishes Background stamp also from the NEW November release, into my original MISTI making sure to remove the foam insert. When using a red rubber background stamp such as this you need to remove the foam insert from your MISTI. That is put there to ensure a better stamped image when using photopolymer stamps. It actually gets in the way if you use it with red rubber or any cling mounted stamps.

I stamped the Holiday Wishes Background stamp with Simon Says Stamp Fog ink leaving a very light text background for my card. I then cut this panel down to 3 1/2 by 4 3/4. I mounted it to a Simon Says Stamp Fog card base using Scotch 3M foam adhesive to give it a bit of dimension.


I stamped the image of the poinsettia onto the same white cardstock using Simon Says Stamp Intense Black ink and colored it using my Copic markers. I used only two color families to color my image. I used Red R59, R29, and R27. I am always exploring with my red color combinations to get the best one. I also used Green G46, G43, and G40. I used the coordinating dies that are also available in this month's bundle, which is the best way to shop and save money. 

Before sticking it in place on the card I wanted to experiment with Nuvo drops. I had originally wanted to have a green drop with a red drop on top to mimic the center of some of the photos I had been researching, but after mocking one up I didn't think it would work out. So, I switched gears and used Nuvo Vintage drops in Pioneer Green alone. I wanted the center of the flower to appear bumpy and textured so I made super small drops and waited for each one to dry matte before adding the next drop. I was trying to make them individual drops. I must not have waited long enough because they ended up attaching to one another over night even after I attached the flower to the card. Although they didn't separate, I still saw texture and I liked it. I attached the flower with foam tape to pop it up on the card panel. 

For the sentiment, I stamped the "warmest holiday wishes" stamp onto My Favorite Things Black Licorice cardstock and heat embossed it with Ranger White embossing powder. To cut it down into a strip I used my Fiskars Wire Guide paper trimmer. This helps me line it up and cut (kinda) straight. I used the same foam tape to pop up the sentiment and tuck it in under the flower on the left hand side. 


To add a little something shiny I added the Sophisticated Enamel Dots also by Neat & Tangled, scattered throughout the background.

For more inspiration using products from Neat & Tangled NEW November release (CLICK HERE!) and see cards from the rest of the design team. 

Thank you so much for visiting my blog today.

Koren 


Monday, November 18, 2019

Neat & Tangled November Release: Day One


Hello everyone. It's Day One of Neat & Tangled's November release, and I absolutely loved playing with it. My favorite in the release is the Holiday Wishes Background stamp. I fell in love with it and you will see me use it a bunch throughout the week. Today I used it to create a very clean and simple card.

The new release is AVAILABLE NOW! You can (CLICK HERE!) to shop. Make sure you comment here and over on the Neat & Tangled blog for your chance to win today's Giveaway. Winners will be announced this Friday over on the N&T blog.

Today, I used the NEW Holiday Wishes Background stamp to create a tone on tone background. I stamped the red rubber background stamp using my original MISTI. It was stamped with Simon Says Stamp Fog ink onto a piece of coordinating cardstock. I stamped it directly onto the card base, so I had to make sure to line up the stamp just right in the MISTI to avoid stamping on the back of my card.


I then stamped the "laurel" type images in the NEW Classic Christmas stamp set also in the NEW Neat & Tangled release. I stamped them with Simon Says Stamp's Intense Black ink onto Neenah 110 lb. Classic Crest Solar White cardstock. I used my Copic markers to color them and their coordinating dies to cut them out. I popped them up into the lower right hand corner of the card front using Scotch 3M foam tape.

For my sentiment, I stamped the "Merry Christmas" from the same Classic Christmas stamp set with Nuvo Clear Mark embossing ink onto My Favorite Things Black Licorice cardstock and heat embossed it with Ranger White embossing powder. I used my Fiskars Wire Guide paper trimmer to cut it down to a small strip. I used the same foam tape to pop this up as well.

That is my super simple card using the NEW Neat & Tangled November Release. Make sure you (CLICK HERE!) to visit the Neat & Tangled blog to find tons more inspiration from the rest of the design team as well as as shop the new release.

I hope that you will join me again tomorrow for day two. Thank you so much for visiting my blog today.

Koren


Sunday, November 17, 2019

The Craft Cast Episode 5 and The Gray Muse


Hello everyone.

Today on The Craft Cast Episode 5, at 3:00 PM EST over on my YouTube Channel, we will be talking LIVE with Ruby- the owner and creator behind The Gray Muse . If you are available at that time to stop by and chat with Tim and I, we would love to have you. You can find a link to my YouTube under my photo here on my blog or (CLICK HERE!).


To visit Ruby's shop and to check out everything that is The Gray Muse (CLICK HERE!).

I also have a card project today using The Cats In The Craftroom stamp set by The Gray Muse. I started with a piece of Neenah 110 lb. Solar White Cardstock cut to 3 1/2 by 4 3/4 inches. I used one of my Nuvo blending brushes with the short handle to add a little bit of Versamagic Chalk ink in Aegean Blue to the upper center of the card.


I then loaded the card panel into my Mini MISTI as well as the little cat paw stamp from the same Cat's In The Craftroom stamp set. I stamped it three times using the same Aegean Blue ink making a trail of cat footprints in the background.

I stamped the main image of the cat coloring on some paper. I love this image. I stamped it using Simon Says Stamp Intense Black ink. Then I used my Faber Castell Pitt Pastel Pencils to color the image. These pencils are super-easy to use. You add color in the darkest of shadow areas and draw the color out using a blending stump or a brush of some kind. I really enjoy using a product called Fantastix to blend out my pastel pencils. I liken this coloring medium to coloring with chalk or pigment powder. It can get very dusty so I use a Nuvo Surface Sweep brush to clean up and excess pigments that are lying about.

I used my Brother Scan N Cut 2 to cut out my image. I do not enjoy fussy cutting and even though the electronic machine isn't always perfect, I believe it still does a better job than my hands do with fussy cutting. I added a small library clip that I bought from Stampin' Up! and had lying around in my stash. I love to buy little embellishments such as this to add to my card projects.


For the sentiments. I used both MFT Blue Yonder and Cornflower to mix it up a bit. I stamped the "I miss you", "I love you", and the "you're the best" from the same Cats In The Craftroom Stamp Set with Nuvo Clear Mark embossing ink. I then used Ranger White embossing powder and my Wagner heat tool to heat emboss them one at a time. I used my Fiskars Wire Guide paper trimmer to cut them into tiny sentiment strips.

The cat image as well as all of the sentiment strips were popped up using thin strips of foam adhesive. The entire panel was adhered to a piece of white craft from cut slightly smaller than the panel itself and attached to a Simon Says Stamp Fog card base using tear tape adhesive. The card is a traditional size A2 scored in a top folding portrait orientation.

To see all of what The Gray Muse has to offer as far as stamps and their beautiful selection of enamel pins perfectly curated for the card maker in mind. (CLICK HERE!) to visit the website.

Thank you so much for visiting my blog today.

Koren

Sunday, November 10, 2019

Spellbinders Scenic Snapshots


Hello everyone.

Today I have two cards featuring Spellbinders Shapeabilites Scenic Snapshots Harvest Time and Adventure Time. I love these sets. The size is perfect even without the coordinating bell jar die in the Santa's Workshop set. One of my favorite way to make a card is to create a small scene. This set does that for me. I love how these cards turned out.

To shop the entire Spellbinders Shapebilites Scenic Snapshots Collection (CLICK HERE!).

For the first of two projects, (which were made in very similar ways), I cut a piece of Neenah 110 lb. Cardstock to 3 1/2 by 4 3/4. I then took a piece of Avery Repositionable Label Sheet and a very old Spellbinders set of oval dies and cut an oval from the label sheet. I have had this set of dies for such a long time, and like many of my Spellbinders die sets, I love it when I have an opportunity to play with them. They were probably the first die set I ever bought. Anyway, I set aside the oval and used the negative mask left by the die to mask the parts of my card that I do not want the ink to get on. I tried to center the oval as best I could. It helps to cut the piece of label sheet to the size of the card panel you are working with before you die cut the mask. Doing this helps you line up the mask to apply it to the card panel.


After the oval mask was positioned the way I liked it, I then took VersaMagic Chalk Ink in Aegean Blue and a Nuvo Blender Brush and brushed the ink towards the bottom of the oval blending the ink upwards towards the top of the oval. I was trying to blend it to white somewhere around the top of the oval. I did this for both backgrounds used on the projects today.

I wanted to stamp my sentiments for each card before creating the scenes. I used Simon Says Stamps You Got this stamp set for both "keep going" and the "you make life beautiful" sentiments. I stamped them with my Mini MISTI using Versafine Clair Nocturne ink.

I then began the arduous task of cutting all of my die-cut pieces. I used the mountains and one layer of grass to create my scene. Varying the adhesive depths to get some dimension. I added snow caps to my mountains as well as a pine tree towards the forefront. I used a thin strip of clear foam adhesive to add it to the scene. I also used one of the clouds up in the sky using foam adhesive to pop it up.


The second card was created using the ray of the sun adhered flat to the background with liquid adhesive. When I was choosing an oval size for the background mask, I used the size of this sun ray to determine which size die was used.

I then used the trees and their tops in varying depths for dimension as well as two layers of grass. I will make sure I link all of the cardstock used on these projects below. Last was the barn and all of its components. I cut some yellow cardstock to fit behind the barn to make it look like light was coming from within the barn. I also considered using a dark gray but I wanted to keep the card bright. I don't know. Maybe the next card I will use gray.

I hope that I've inspired you to create something today. To check out more from Spellbinders (CLICK HERE!).

Thank you for visiting my blog today,

Koren


Friday, November 1, 2019

Neat & Tangled October Release Week: Recap


Hello everyone. It ’s the end of Neat & Tangled’s October Release Week. I hope you all have seen some inspiring ideas to create with the new release. I truly loved creating with this release and I hope you enjoyed it too.

You can purchase the entire release as a bundle (CLICK HERE!).

I created a few cards to create a simple note card set using the NEW Circular stamp set from Neat & Tangled’s October release.  These cards are super simple but fun to create. You can find tons of inspiration over on Pinterest, using all kinds of circle patterns.

These cards do not use sentiments so they can be sent with a personalized written note inside. I like keeping these types of cards on hand to communicate with my kids teachers or personnel in my doctor’s office.

The winners of the giveaway for each day this week should be announced today over on the Neat & Tangled blog.

Thank you so much for visiting my blog today,

Koren

Thursday, October 31, 2019

Neat & Tangled October Release Week: Day Four


Hello everyone. It’s Day Four of Neat & Tangled’s October Release Week. Today I’m using the NEW Circular Stamp Set to create a fun universal card that can be used all year round with tons of different color combinations.

(CLICK HERE!) to check out the Neat & Tangled Website to shop the NEW October release and visit the blog for lots of inspiration. Comment here and over on the N&T Blog for your chance to win today’s GIVEAWAY. Winners will be announced tomorrow Friday on the Neat & Tangled Blog.


I started with Neenah 110 lb. Classic Crest Solar White cardstock cut to 3 1/2 by 4 3/4. I loaded it into my Original MISTI and stamped all of the circles in the NEW Neat & Tangled Circular Stamp Set in a random pattern filling the available space on the panel. I used Gina K  dye inks in Passionate Pink, Sweet Mango, Blue Lagoon, Wild Lilac, and Wild Dandelion. I also used Hero Arts Green Hills. I stamped them several times each to make sure I got great coverage using the solid stamps.

I then stamped the outline circle for each coordinating circle off center with Ranger Archival Ink in Jet Black. The outline image as well as the solid color circle are both available in the NEW Circular stamp set.


I took the “smile” stamp from Neat & Tangled’s So Many Sentiments. I aligned the sentiment in the open space on the panel and stamped it with the same Jet Black ink.

I then added the entire panel to a Simon Says Stamp Fog card base cut to size A2 and scored in a top folding portrait orientation. I added the panel with a piece of craft foam and Tombow Mono tape runner adhesive.

Make sure you (CLICK HERE!)  to visit the Neat & Tangled website to shop and visit the blog to see tons of inspiration from the design team.

Thank you for visiting my blog today,

Koren

Wednesday, October 30, 2019

Neat & Tangled October Release Week: Day Three


Hello everyone. It’s Neat & Tangled’s October Release Week- Day Three and I have another card that features the NEW Circular Stamp Set from the October Release. I also used a sentiment from the NEW Heartfelt Thanks Stamp Set. I really went for a vintage and more muted color scheme for this one, and definitely feel like the colors nailed that feeling.

Make sure you (CLICK HERE!) to visit the Neat & Tangled website to shop the new release and to check out the blog for tons of inspiration from the design team using the new release.

Comment here on this post, and on the N&T blog for your chance to win today’s GIVEAWAY. The winners will be announced Friday over on the Neat & Tangled blog.


I started with a piece of Neenah 110 lb. Solar White Classic Crest cardstock cut to 3 1/2 by 4 3/4. I loaded it into my Original MISTI along with the largest of the circles from the NEW Neat & Tangled Circular Stamp Set from the October Release. I placed it in the upper right hand corner of the panel stamping it each time and moving the stamp along the pattern. Trying desperately to keep them in line.

I used Gina K dye ink in Blue Lagoon, Honey Mustard, Peach Bellini, and Faded Brick. I also used Altenew Emerald. I stamped them each multiple times to ensure good solid coverage.

For the sentiment “a heartfelt thanks for all the love and joy you bring to my life” is from the NEW Neat & Tangled Heartfelt Thanks Stamp Set. I stamped it on Papertrey Ink Saffron Spice cardstock with Nuvo Clear Mark embossing ink and heat embossed with Hero Arts Gold embossing powder.


I cut down the sentiment strip using my Fiskars Wire Guide Paper Trimmer and popped it up onto my stamped background using Scrapbook Adhesives Foam Squares.

The entire panel was added to a Simon Says Stamp Fog card base cut to size A2 and scored at in a top folding portrait orientation. I used craft foam and Tombow Mono tape runner adhesive to pop it up.

Make sure you (CLICK HERE!) to visit the Neat & Tangled website to shop and check out all of the inspiration being shared on the blog by the design team.

Thank you so much for visiting my blog,

Koren

Tuesday, October 29, 2019

Neat & Tangled October Release Week: Day Two


Hello everyone. It’s Day Two of the Neat & Tangled October Release Week. If you haven’t checked out the entire NEW Release (CLICK HERE!) to visit the Neat & Tangled website to shop the release and to check out all of the inspiration for the design team being shared on the blog.

Make sure you comment below as well as on the Neat & Tangled post for today for your chance of winning today’s GIVEAWAY. The winner’s of this weeks giveaways will be announced this Friday over on the N&T Blog.

For todays project I’m using the NEW Circular Stamp Set to create a card inspired by some geometric art I found on Pinterest. To follow me on Pinterest (CLICK HERE!) I have several boards that I pin inspiring photos and color combinations for future reference.

Today’s project isn’t as simple as it looks. With its clean and simple design came lots of measuring and marking to make sure the squares did not look completely wonky.  How did I do? Maybe it’s still wonky, it’s ok. I did my best.


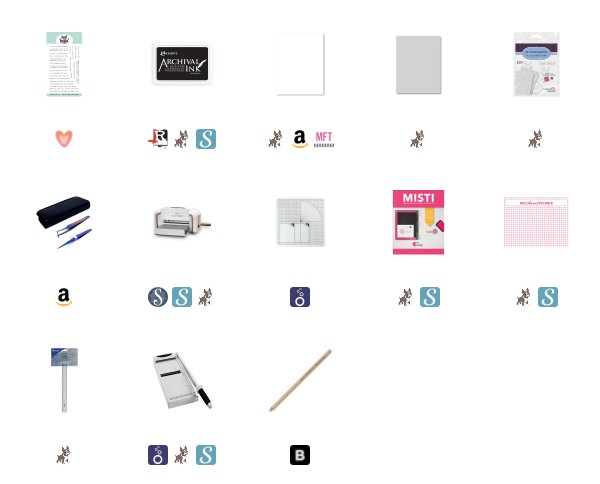
I took a Simon Says Stamp Fog card base cut to size A2 and scored in a top folding portrait orientation and loaded it into my Original MISTI. I aligned the sentiment from Neat & Tangled’s Typed Sentiments Stamp Set that says “I am inspired by your strength”. I stamped it using Ranger Archival Jet Black Ink. This ink will be available in the Neat & Tangled shop for a limited time while supplies last.

To stamp the squares, I cute nine 1 inch by 1 inch squares out of Neenah 110 lb. Solar White Classic Crest cardstock. I loaded them into my MISTI, into the lower corner as far as it would go. I also took the largest circle from the NEW Circular Stamp Set available now in the October Release. I used the same Ranger Archival Jet Black ink to stamp all nine squares the exact same way.

I found the pattern on Pinterest and used it to arrange the circle quarters into a very modern abstract placement. I used a T-Ruler to mark straight lines about 3/4 of an inch off both the right and left side of the card base. This will help me align the squares a little straighter.

I used Scrapbook Adhesives Foam Squares to pop up each individual square into place. Using the lines I made as a guide and then eyeballing the center row to line up with the other.


If the ink did not stamp perfectly, I did stamp it multiple times. I also took a black Copic marker to fill in any areas that were not black enough. Be careful because archival ink is not alcohol marker friendly and can make your lines bleed if you were using it to stamp a lined image and then color it with alcohol markers. I used this technique sparingly as to not create any issues with bleeding. You can still see some variations in the black solid image because of the nature of the ink.

This card was simple to create once I figured out a way to align the squares in a fashion that didn’t look too incredibly wonky. I really enjoyed this card and it’s sophisticated style.

Make sure you (CLICK HERE!) to visit the Neat & Tangled website to shop and check out all of the inspiration being share on the blog this week. The NEW October release is now available in the shop.

Thank you for visiting my blog today,

Koren