Wednesday, February 28, 2018

Just Cards Video Hop Card Video

Hello fellow card makers.

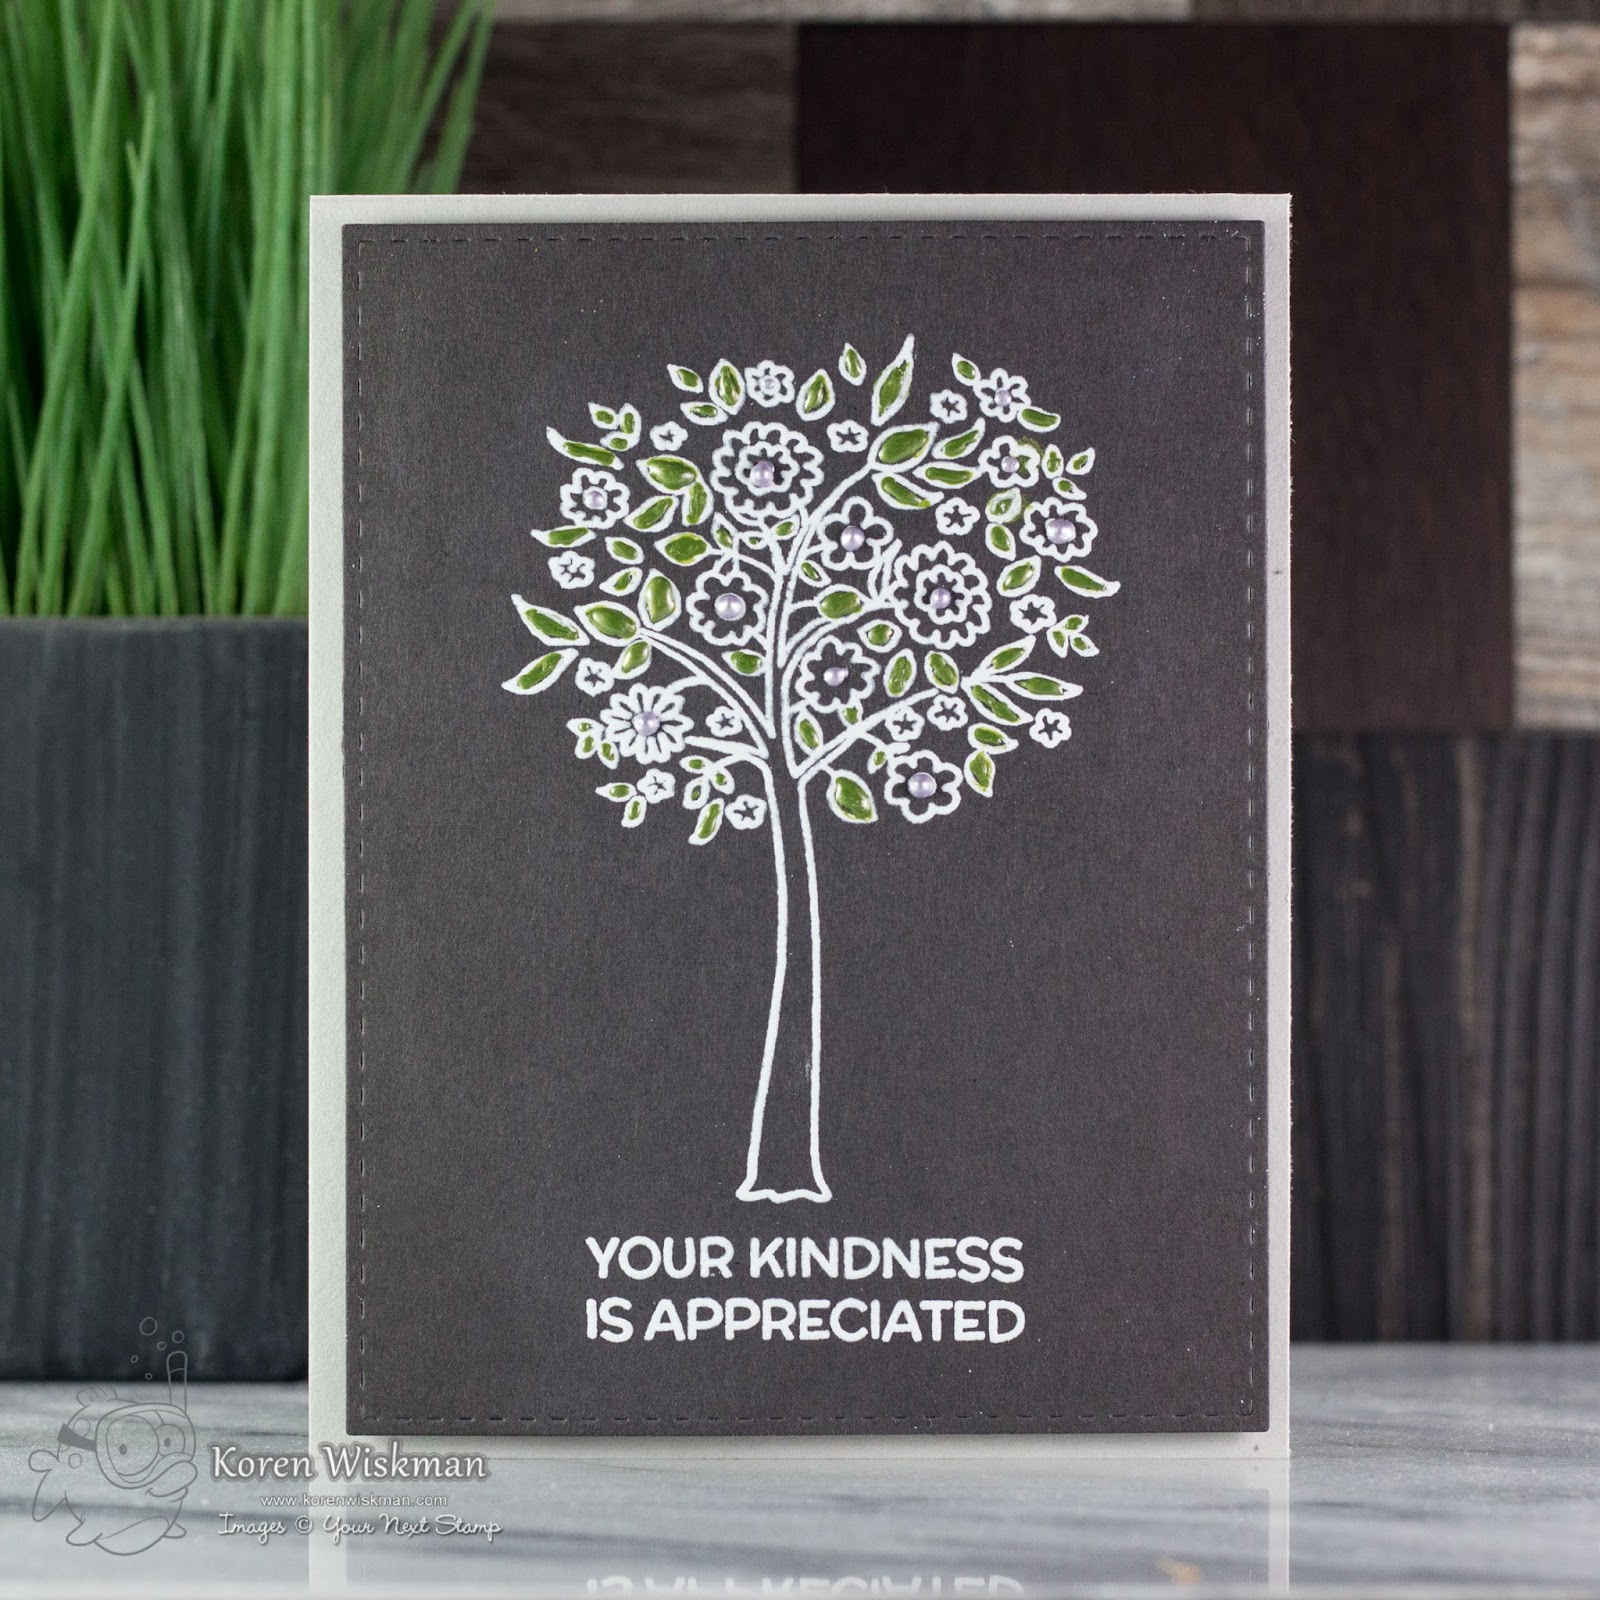
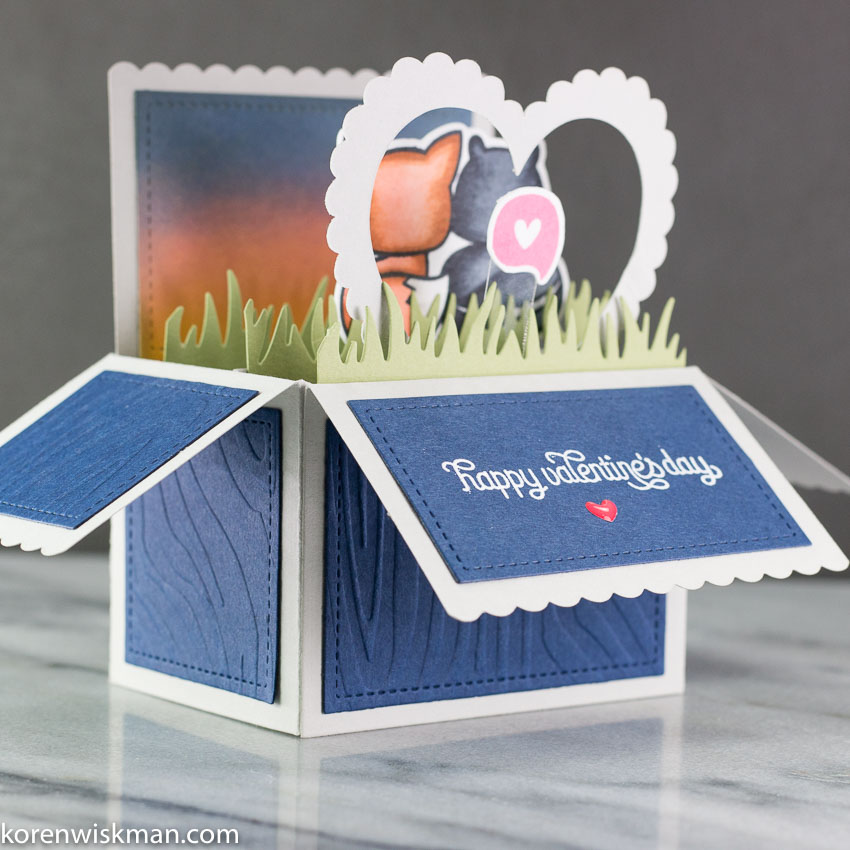
Today I am participating in the Just Cards Video Hop. We were supposed to create a masculine card, but I failed to see that part or it just didn't register to me, so my card IS NOT masculine. Its actually quite feminine, even for me. To watch the video click the link below and it will take you to my YouTube channel, so that you can watch the video I created. I will also post photos and links to the products used here for your reference. I hope you enjoy the hop.


I used the Ride With Me stamp set from Neat & Tangled's latest release to create my card today. I stamped the images with Simon Says Stamp Fog ink onto Neenah 110 lb cardstock and colored them with Faber Castell Goldfaber colored pencils. They are a wax based colored pencil similar to Prismacolor pencils but I find them to be a bit harder and easier for me to use.


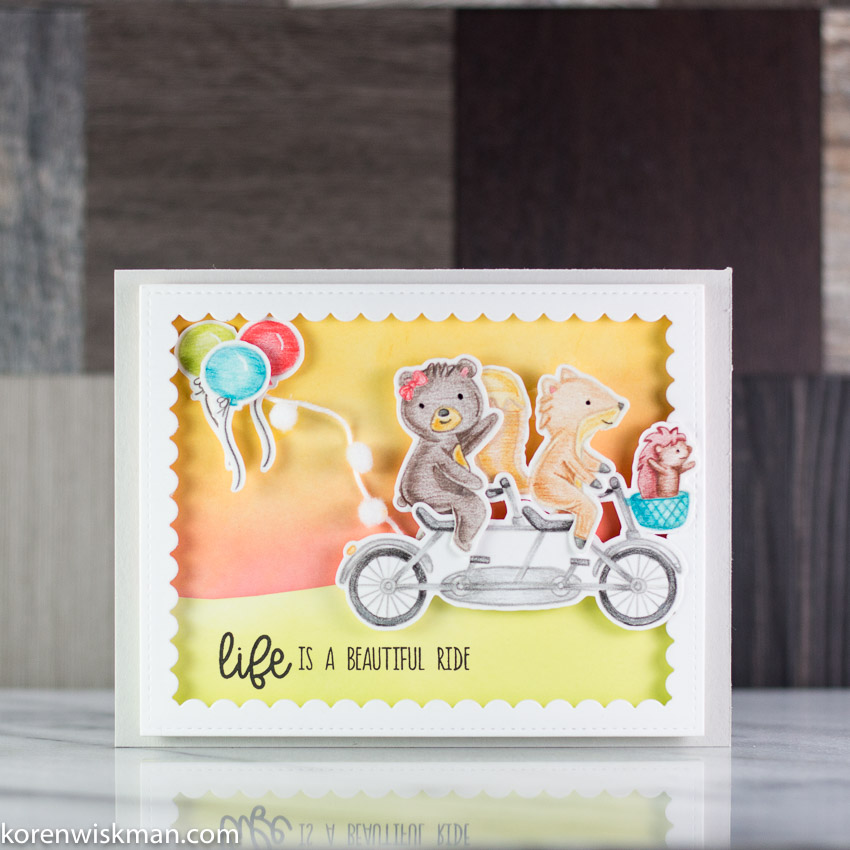
I cut the frame from Pretty Pink Posh Scalloped Frames dies out of Neenah 110 and I also cut my background piece to fit snugly behind the frame. As for the background, I created a mask using the MFT drifts and hills stencil out of Avery repositionable label sheet. I masked of the sky and ground to do some ink blending with Distress Oxide inks in Abandoned Coral, Wild Honey, and Twisted Citron. 


I placed two eyelets using my Provo Craft Silent Setter. Once was placed behind the back of the bike and the other up in the sky behind where the balloons were placed. This allows me the ability to attach my white twine to my card. I wanted it to appear as though they were riding with a trail of balloons and pom poms. I used washi tape to adhere my white twine in place, and Glue Dots were used to adhere the pom poms to the twine. The sentiment also from the Ride With Me stamp set was stamped with Versafine Onyx Black ink.


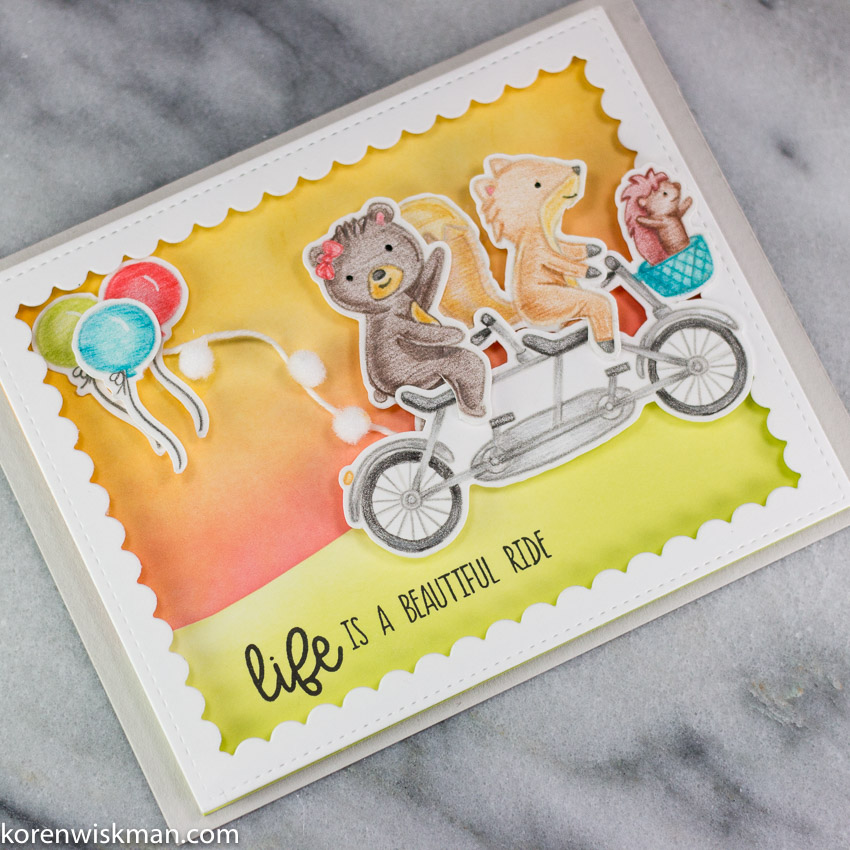
The frame was adhered with thin strips of foam adhesive and popped up onto the ink blended panel. I then began to adhere my images with Scotch 3m foam tape. I wish that I had purchased the coordinating dies to go with this stamp set because the dies cut out the white space that you see on the bike. I would much rather see more background than all of the white space. Hind sight is 20/20. I really like how the card turned out, and I hope you do too.

Here is the list for rest of the people on the video hop, enjoy!


Christine: https://youtu.be/1Nwyq0Ylfdc
Nadine: https://youtu.be/ziNU_cTemdk 
Alicia: https://youtu.be/a634OS0s9gk 
Koren: https://youtu.be/iy7xqcSKgQE ----------(ME!) 
Linda: https://youtu.be/Nb45FgRzayE 
Anna: https://youtu.be/ZjCFywdfrW0 
Gale: https://youtu.be/Vg6iO-YOgk0 
Monica: https://youtu.be/DTvW_AB8Djc 
Terri: https://youtu.be/t_OBdAhqMVo 


Thank you for visiting my blog today,

Koren

Saturday, February 24, 2018

A Joy Easter Card

Hello fellow card makers.

Today I am sharing with you a card I made, which was inspired by the alcohol ink card I did a while back. I love love love to dye Easter eggs. So when I was playing with my alcohol inks, I immediately thought of dying Easter eggs. I tried a few different color combinations but this one was my favorite. I liked it so much that I sent it to SCT Magazine for submission to their Spring 2018 edition. I didn't make the cut, but I decided to share the card with all of you.


I started with blending drops of Ranger Alcohol Ink in Cloudy Blue and Snow Cap mixative together on a piece of Ranger Yupo paper. Once that was dry, I added lines of Ranger Multi-medium Matte liquid adhesive. This is where I added Nuvo Gilding flakes to my project. I also gave this time to dry. After the piece was dry, I used a Frantic Stamper Egg dies to cut it down. I adhered it to a piece of Neenah 110 lb cardstock that had been ink blended using the MFT Radiating Rays stencil and Versamagic Aspen Mist ink. That panel was cut down using a Your Next Stamp Stitched Rectangle die (second from largest). I adhered both panels to white craft foam to add dimension.

To add the sentiment, I cut out several layers of the word JOY from Neenah 110, using Neat & Tangled's Journaling Alphas. I adhered them together using liquid adhesive and centered the word joy in my egg. That was it, pretty simple. Not a traditional Easter card. My husband thought it was odd associating Easter with JOY. I told him that next time I'll just put... YOLO, LOL, JK, BRB, - Jesus

Thank you for visiting my blog today,

Koren


Thursday, February 22, 2018

Your Next Stamp Winter Warm Up Card Video

Hello fellow card makers.

Today I am sharing my project for Your Next Stamp February Feature Day with the theme "Winter Warm Up". Before we get to my card, make sure you (CLICK HERE!) to visit the Your Next Stamp blog to see what the rest of the design team came up with around the theme for this months feature day, and to comment for your chance to win a stamp set of your choice from the Your Next Stamp online store.


I got inspiration from a card Dexter saw on my Pinterest boards here is a link to it: http://snippets-of-mendi.blogspot.com/2015/03/lori-whitlocks-march-blog-hop.html#.WoThfmaZPJM 
For my project I used the new Fire Up the Fun stamp set, which features some adorable fire fighter themed images. I'm using the fire truck image, and this really neat vertical sentiment the reads "you're my HERO". I started with an A2 sized landscape card base in Simon Says Stamp Fog cardstock, and cut the background down with the large scalloped rectangle die from My Favorite Things Blueprints 1 Die-namics set. First I stamped the wave background (also by MFT) with Versamark ink on a piece of Simon Says Stamp's Sea Glass cardstock. I then heat embossed it with Wow, Silver Pearl embossing powder.


I cut down a piece of Papertrey Ink's Limeaide Ice cardstock with the same scalloped rectangle by MFT and cut some grass into it with the Your Next Stamp Grass Edge Border die. I love this die because the grass is so unique and wacky. I used it here to replicate roadside trees, bushes, and grass. The bottom piece I cut to look like road is Papertrey Ink's Smokey Shadow.


This bottom road like piece is where we are going to use the Waffle Flower Pull Tabs die to create slider piece for the fire truck to go on. For more explanation of this section, please check out the video that I made while creating this card. I will leave the video linked below. In the video I create this slider portion using only the Waffle flower Pull Tabs die set.

I then cut the smokey clouds also out of PTI's Smokey Shadow cardstock using Memory Box's Cloud Bank die set. I stamped the sentiment in Versamark ink and white heat embossed it using Hero Arts Ultra Fine White embossing powder.  I used a combination of foam tape and double sided tape to adhere everything together.


I stamped the fire truck image from the Fire Up The Fun stamp set with Your Next Stamp Black Olive Ink onto a piece of Neenah 110 lb cardstock. I used my favorite colored pencils to color the image- the Goldfaber colored pencils by Faber Castell. I really love colored pencil colorings that you can still see the lines that the pencils left around the image. I know this is personal preference. Some people like to use Gamsol to blend the colored pencil to almost erase those lines, but I prefer to see them. Those lines remind me of coloring as a kid and those are fond memories for me.  I have the colors I used to color it listed below in a Goldfaber color map. The image was adhered with Ranger Multi Medium matte liquid adhesive.


Thanks for visiting my blog today. Don't forget to (CLICK HERE!) to visit the Your Next Stamp blog to see what the rest of the design team came up with for our Winter Warm Up!

Koren

Saturday, February 17, 2018

Artist Gather Light Up Chibitronics Video

Hello fellow card makers.

Today I am sharing with you a project that I made using an Artist Gather stamp set and some Chibitronics. If you haven't heard of Artist Gather, you should totally check her out, her name is Sarah and you should tell her that I sent you. I met her at Creativation, and she is the very definition of a budding artist. She is an excellent photographer, videographer, and scrapbooker. Please (CLICK HERE!) to visit her site or Instagram account (CLICK HERE!).

I used the Artist Gather Light Up a Little stamp set to create my card today. This stamp set is design to create a light box. The set comes with sentiments that fit right into the light box. You can also purchase separately, an entire alphabet set to create your own sentiment within the light box. When I saw this set, I knew I wanted to use my Chibitrontics starter kit to make this light box come to life.


I started with a piece of Neenah 110 lb cardstock. I cut out a window using MFT's Jumbo Peek-a-Boo window die, and also cut down my panel using a Your Next Stamp Stitched rectangle die (second from largest). I stamped the light box and the sentiment on a piece of Papertrey Ink vellum with Staz On Jet Black ink. I adhered the piece of vellum to the backside of my card panel with 1/2 inch double sided tape. I completed the stamping using the single heart from the Light Up a Little stamp set and "press me" from Heffy Doodle's Interactively Yours stamp set. I stamped them at the bottom center of my card panel with Versafine Onyx Black ink.


This is when things got hairy. I completely forgot how to use my Chibitronics. I had to enlist the help of my husband to make it work. I should have watched my previous light up card video. I didn't make a switch out of cardstock. Don't be like me, make a switch. But! It works, the card lights up. To see it in action follow the link below to my YouTube video I made creating this card. Remember to make a switch out of cardstock and to adhere the copper tape securely, being sure to run the positive end of the battery to the positive end of the light and the negative end of the battery to the negative end of the light. If you do those things your card should light up. Clearly there are far smarter YouTubers out there with easier ways to use Chibitronics. Don't be like me, do some research to make it easier for you.


Now, once the card was functional, I adhered it all together using three layers of Scotch 3M foam tape. I used a Simons says stamp A2 top folding card base. I adhered my light up panel to the card base with 1/2 inch double sided tape. You can see the copper tape behind the vellum piece, but that doesn't bother me.


Thank you for visiting my blog today.

Koren

Friday, February 16, 2018

Your Next Stamp Challenge 83

Hello fellow card makers.

Today I am sharing my project for Your Next Stamp Challenge #83. This is a biweekly sketch and/or color combination challenge. To play along with us or to check out the rest of the design teams inspiration (CLICK HERE!) to visit the Your Next Stamp blog. You can use either the sketch, the color combination, or both. Here is a look at this weeks sketch/color combo.


This week I was more inspired by the color combination that I was the sketch. I really just wanted to play with the new Your Next Stamp window die. So my card features it and the new Woodland Jessica stamp set.

I started with stamping some images from the Woodland Jessica stamp set with Versafine Toffee on Ranger watercolor cardstock. This ink is waterproof and I new I wanted to break out my Distress markers to have a play. I colored them with Distress markers and added some accents with my favorite colored pencil the Faber Castell Goldfaber pencils. Then I used the coordinating dies to cut out my images.


For the background, I used the new Window Panel die and cut it out of Neenah 110 lb cardstock. I took the negative pieces of the die cut panel and ink blended some clouds with Versamagic Aspen Mist and then some ground from Versamagic Thatched Straw. I used the MFT mini cloud stencil to make the clouds. I adhered the window panel die flat to a top folding Neenah A2 sized card base with Tombow Mono liquid adhesive. I also adhered the newly ink blended negative panels into the spots that they were taken from, using the Tombow Mono liquid adhesive.


I stamped the sentiment with Distress Oxide Ink in Vintage Photo. I adhered all of my elements to the card front with the same liquid adhesive. I added a little bit of colored pencil accents that you can barely see in the photo. I cut the part of the tree that was hanging off my card and presto, I'm done!


Thank you for visiting my blog today. If there is time, you should (CLICK HERE!) to play along with us over at Your Next Stamp with Challenge #83.

Koren


Wednesday, February 14, 2018

Your Next Stamp Layer It Up Card Video

Hello fellow card makers.

Today I am sharing my card for Your Next Stamp. We on the design team and guest designers were challenged to create a project around the theme "layer it up". So I did! My project has many, many layers. To check out what everyone else created and to get even more inspiration (CLICK HERE!) to visit the Your Next Stamp blog.


I started with the brand new Farm Animal Stack die by Your Next Stamp. I was excited to play with this. I new that I wanted to make a shaker card. The die is so thin, I decided to stack a bunch of layers of the die to create the shaker instead of adding thin strips of foam tape. I made it easier on myself by lining a piece of Neenah 110 lb. cardstock with Stick it adhesive. This puts a sticky tape on the back side of my die cuts which makes it easier to put multiple layers together. I cut nine layers of out of the detailed Farm Animal Stack die. Stacking them together was easy with the addition of the stick it adhesive. To see this card being made, look below for a link to my YouTube video I made creating this card.


After stacking all those layers. I added more layers. I cut the top of the shaker piece out of Bazzil white, which is a textured cardstock. I applied the acetate to the back of this top layer and added to my enormous stack. Now that I have lots of demotion for my shaker bits to move around in, I added Pretty Pink Posh, Petunia, Marshmallow, and Daffodil seed beads to color my images and to add that shaker quality sound.


For my background, I used the MFT mini cloud stencil and Versamagic Agean blue ink to stencil some clouds. I felt like the top of this piece was a little dark so I added some PTI vellum clouds with the Puffy cloud border die by Your Next Stamp. I cut arms in the side of this piece and folding around my card to hug it. I used washi tape to secure it on the backside. I also cut hills with the Double Stitched Hills die set also by Your Next Stamp. I cut them out of Bazzill Parakeet textured cardstock. I cut them down with the second to largest Stitched rectangle die by Your Next Stamp.


I stamped my sentiment from the Funny Farm Sentiments stamp set using the Versamagic chalk ink and clear heat embossing it with Hero Arts Clear embossing powder. I adhered the rest of the pieces to my Simon Says Stamp Fog A2 sized top folding card base with double sided adhesive tape. This is a super sticky tape and it does a great job at keeping things in place, including that ultra heavy shaker piece.

Thank you for visiting my blog today and don't forget to check out the rest of the inspiring projects on the Your Next Stamp blog (CLICK HERE!)

Koren


Saturday, February 10, 2018

Your Next Stamp February Release Blog Hop Video

Hello fellow card makers.

Today, I am sharing with you two projects for the Your Next Stamp February Release Blog Hop. As always, this release is super cute! My favorite of the release has got to be the "Fire Up the Fun" stamp set and coordinating dies. I just love the tribute to fire fighters.

Comment along the blog hop for your chance to win a $25 gift certificate in the Your Next Stamp online store. The more you comment, the more your chances of winning increase. Let's get through the info so we can get to some card making! The blog hop starts today February 10th at 10pm and ends in three days time on February 13th at midnight. The winner will be announced on February 15th on the Your Next Stamp Blog. Good Luck!


Your Next Stamp is always super generous and gives you a coupon code every release! Can you believe it. It's not a small discount either, it's 20%. Here is this months coupon code to use in the Your Next Stamp online store. It's only good to use during the hop, so hurry (CLICK HERE!)


Finally, lets get to my projects. For my first project I used the brand new "So egg-citing" stamp set and coordinating dies. Because I am typing up this blog post in advance of the product release, (CLICK HERE!) to visit the new products page at Your Next Stamp to check out the entire new release. I started with an A2 sized top folding card front piece of Neenah 110 lb cardstock. To make this a little easier on me, I am also using my MISTI and a transparency grid from Simon Says Stamp. For a visual of how I created this project, check out the link to my YouTube video linked below. I lined up the egg images in a row of five along my card panel and stamped them with Your Next Stamp Black Olive ink. I continued doing this, leaving some space for the chick images in various areas along the background.  I completed 9 rows like this.


After I completed stamping the background, I stamped the chick images from the same stamp set also in Memento Tuxedo Black ink on Neenah 110 lb cardstock. I colored both the background and the chicks with Copic Markers. I did very simple coloring because these images are so small. After coloring the images I attached the chicks to the open spots on the background with Scotch 3M foam tape to pop them up a bit.


As for the sentiment. I chose the "You are egg-stra awesome" sentiment from the set and stamped it with Versamark ink on a piece of Lawn Fawn Black Licorice cardstock and white heat embossed it with Hero Arts ultra fine white embossing powder. I cut it into a simple square with my paper trimmer and popped it up on the top right of my card with foam tape. I adhered the card panel to a piece of Simon Says Stamp Fog cardstock.


For my second project today, I am using the brand new Woodland Jessica stamp set by Your Next Stamp. This stamp set comes with the most adorable woodland critters. I happen to not be using them on this card, but I have something else planned for them later this month. This card was super simple to create and I think it turned out rather striking.


I took the tree image from the Woodland Jessica set and stamped it on a piece of Taylored Expressions Poppy Seed cardstock with Versamark ink. I white heat embossed it with Hero Arts ultra fine white embossing powder. Instead of coloring the leaves and flowers, I decided to try to accent the flowers and leaves with Nuvo Crystal drops. I used Bottle Green and Wisteria Purple Nuvo drops for this project. The sentiment on this card was also stamped in Versamark ink and white heat embossed.


I want to thank you for visiting my blog today. Don't forget to check out the new release by Your Next Stamp, just (CLICK HERE!). Follow along the hop and comment along the way for your chance to win a $25 gift certificate to the Your Next Stamp online store. Last but not least, remember to use the fabulous and generous coupon code listed above for 20% off your order during the hop.

Koren


Fire Up the Fun with Your Next Stamp's February Preview Day

Hello fellow card makers.

Today I am sharing with you a card I made for Your Next Stamp's February Preview Day. Today each of us on the design team, and some special guests are sharing preview projects using tomorrows Your Next Stamp February Release. (CLICK HERE!) to visit the Your Next Stamp blog and see what everyone else has created to help inspire you.

Don't miss the Your Next Stamp February Release Blog Hop tomorrow (February 10, 2018) at 10pm. (CLICK HERE!) to visit the New Products page at Your Next stamp at that time to see for yourself.

For this project, I used the brand new Your Next Stamp "Fire Up the Fun" stamp set. This is a Fire Fighting theme set with an adorable dog to boot. This is definitely one of my favorites of the release and I have one more card planned using it later this month.


I started with a piece of Neenah 110 lb cardstock to use as my front panel. This is a landscape style A2 sized card. I took my Sizzix Circle framelits and some smaller circles from Neat and Tangled's Little bits and cut out a bunch of different size circles from Lawn Fawn Black Licorice cardstock. I adhered the circles on the white card panel  with Tombow Mono liquid adhesive to create the look of Dalmatian spots on my background. Some where placed slight off the edge of the card front. Those parts of the circles where trimmed off with large Tim Holtz, Tonic scissors.

I then cut a strip out of Taylored Expressions Poppy Seed Cardstock about 2 1/2 inches by 5 1/2 inches. Just large enough to fit the images I planned to use. It was adhered to a piece of black craft foam with 1/2 inch double sided adhesive and then to the front panel justified to the center. The images were stamped in Your Next Stamp Black Olive ink on more Neenah 110 lb cardstock. My images were colored with Copic markers and cut out with the coordinating die set. I adhered the fireman flat to the gray strip with 1/2 inch double sided adhesive. This die set is amazing. It even cuts the water drops of water coming from the fire hose. The adorable dog was popped up with foam tape.


To create the fire behind the sentiment, I cut a basic tear drop image out of Bristol cardstock with my Brother Scan N Cut. I inked it with Distress Oxide ink in Wild Honey, Fossilized Amber, and Candied Apple with sponge daubers. I found an image of a digital logo with fire on Pinterest and decided to try to replicate it using paper on my project. I cut it out in the shape of a flame and popped it up with Scotch 3M foam tape.

The sentiment was also from "Fire up The Fun" stamp set. I stamped the Thanks in Versamark ink and used Stampin' Up! calypso Coral Embossing powder to heat emboss it. I then stamped the You in Versamark in and used Stampin' Up! So Saffron embossing powder to heat emboss it. I do not believe you can purchase either of these two colors of embossing powder at this time. The last part of the sentiment was stamped with Versamark and I used Hero Arts ultra fine white embossing powder to heat emboss it. It was adhered flat to the already popped up flames.

That's it for my project today, thank you for visiting my blog. Make sure you (CLICK HERE!) to visit the Your Next Stamp blog and check out the rest of the peaks of the release. You can see the entire February Release tomorrow night at 10pm.

Koren


SaveSave

Tuesday, February 6, 2018

A Lawn Fawn Scalloped Box Card Valentine Video

Hello fellow card makers.

Today I am sharing with you, a valentine I made using some products by Lawn Fawn. I have owned this innovative die set for a few months now and haven't made a card with it. I figured it was time to change that. I want to play with more of my products in 2018, (don't we all).

I was inspired by a card I saw on Pinterest by one of Lawn Fawn's own design team members Yaniea. Yaniea can be found on her blog (CLICK HERE!) and on YouTube (CLICK HERE!). She used a classic Lawn Fawn set called, "Into the Woods".  She made the little Fox and Skunk in the set faceless and appearing to be looking away from you on her card. I just love that. So I want to do something with that here on my project.

To get complete and accurate instructions on how to use Lawn Fawn's Scalloped Box Card die set (CLICK HERE!) to watch their video. I do not explain in detail how to use it.


I started with cutting the body of the box twice, as instructed, out of Simon Says Stamp Fog cardstock as well as the three center portions of the box. I used 1/8 inch double sided tape to adhere my box together. I then used Darice's woodgrain embossing folder to create a bark-like texture on some Stampin' Up!'s Night of Navy cardstock. From the Navy blue piece, I used the squares and rectangles included in the set to cut out the accent pieces and attached them with 1/2 inch double sided tape.

I then cut three, three inch, pieces of grass from the Lawn Fawn Grassy Borders die into strips and added double sided adhesive to adhere them to the inside portions of the box. The grass was cut from Stampin' Up!'s Pear Pizazz cardstock.


I don't currently own and scalloped hearts frame dies. I know this is something else that will need to be rectified, ASAP. For now, I want a heart for the recipient to look through on my box card. So, I went to my Scan N Cut for some assistance. For a visual of this part of the project, check out the YouTube video I created while making this project. 

Scan N Cut Canvas Workshop has many designs free for you to use but I just needed one of the basic shapes. I put regular outline image of a heart inside a scalloped image of a heart and made my own scalloped frame heart for my project. I cut this piece also out of Simon Says Stamp Fog cardstock. 

I then began to stamp my images. I loaded up the fox image into my MISTI and stamped it once onto Avery reposistionable label sheet to create a mask for this image. I then loaded some Neenah 110 lb cardstock into my MISTI but instead of inking up the entire image and stamping it, I only partially inked it with the Memento Tuxedo Black Marker. I purposely did not ink the face of the fox. Once it is stamped, the image appears to be looking away from you. I masked the fox with the Avery label material I just cut out and stamped the skunk from the same stamp set right beside the fox in the exact same way.  Last but not least I stamped the tiny speech bubble with the heart in the center with Altenew Coral Berry ink. 


I cut short thin strips of acetate for my images to be held up with. I used super strong Glue Dots on both ends to adhere the acetate to my box and to the image it was holding up.

I stamped the sentiment with Versamark ink and white heat embossed it with Hero Arts Ultra Fine White embossing powder. I cut it out with the rectangle that was designed to go in that front folded down flap. I added a Doodlebug Shaped Sprinkles from their Tiny Hearts.

As far as the sunset goes, well, this is my interpretation of an ink-blended sunset. I think it would also look cool if they were looking out into the stars. I blended Distress Oxide inks in Wild Honey, Abandoned Coral, Faded Jeans, and Black Soot to create my sunset. This was done on a piece of Strathmore Bristol smooth white cardstock. I cut it down with the coordinating piece for that location, which happens to be the wide rectangle. I adhered that piece also with 1/2 inch double sided tape.


Thank you for stopping by my blog today. I hope you have enjoyed it here. Please leave me a comment down below, I love chatting about, well, just about anything.

Koren


Friday, February 2, 2018

Your Next Stamp Challenge #82

Hello fellow card makers.

Today I am sharing with you my card for Your Next Stamp Challenge #82. Your Next Stamp has a biweekly sketch/color combination challenge over on the Your Next Stamp blog. (CLICK HERE!) to visit the blog and to play along in the current challenge. Here is a look at the current sketch and color combination for this weeks challenge.


I am usually more inspired by the color combination than the sketch for these challenges. This week was different. Maybe I'm sick of red and green from Christmas, I don't know. So, my card uses the sketch and not the color combination. I have used the Aquarium Antics stamp set and the Fish Tank Shaker Card die set to create my card for this challenge. 


I started with a piece of Simon Says Stamp Fog cardstock, which I cut down using my paper trimmer to fit the sketch for the challenge. I cut out the Fish Tank from the Fish Tank Shaker die set around the lower center of that panel. I knew I wanted to use a piece of light blue card stock behind it. So I grabbed what I have in my stash, which is Avery Elle and they don't sell it anymore, but I will link what I plan to buy to replace it. I stamped the light blue cardstock using the Wave background stamp by MFT with Versamark ink. I heat embossed it using Wow, white puff embossing powder. It makes these really cool white puffs which reminded me of bubbles. I used Scotch 3M foam tape to pop up the Fog panel over the heat embossed piece. The bottom of the tank is Stampin' Up!'s Night of Navy cardstock and the greenery is Old Olive.


The images where stamped in Your Next Stamp Black Olive ink and colored with Copic markers. I popped them up with foam tape. The Sentiment at the top was stamped with Versamark and heat embossed using Zing embossing powder in the shade Powder. I stamped and embossed it twice to create a thicker sentiment. The sub-sentiment is from What Not Sentiments Four also stamped on Night of Navy cardstock with Versamark and white heat embossed with Hero Arts Ultra Fine white embossing powder. I added a few Glossy White Nuvo Drops and some patterned paper from Echo Park A Perfect Summer 6x6 paper pad to finish off the sketch.

Thank you for visiting my blog today, if there is still time (CLICK HERE!) to come play with us!

Koren