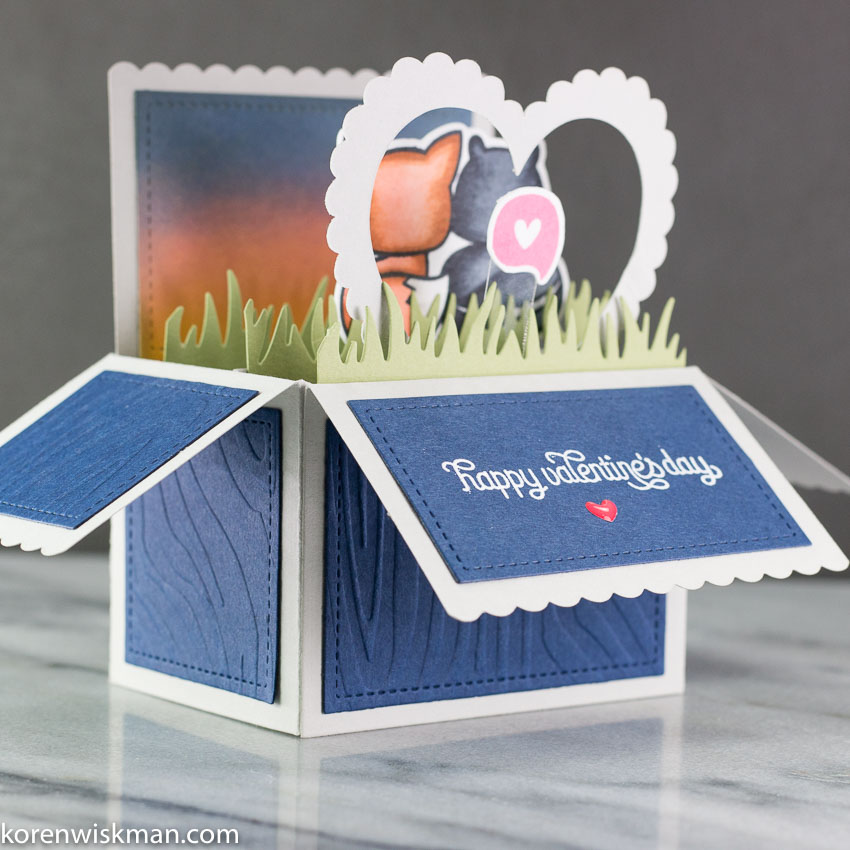
Today I am sharing with you, a valentine I made using some products by Lawn Fawn. I have owned this innovative die set for a few months now and haven't made a card with it. I figured it was time to change that. I want to play with more of my products in 2018, (don't we all).
I was inspired by a card I saw on Pinterest by one of Lawn Fawn's own design team members Yaniea. Yaniea can be found on her blog (CLICK HERE!) and on YouTube (CLICK HERE!). She used a classic Lawn Fawn set called, "Into the Woods". She made the little Fox and Skunk in the set faceless and appearing to be looking away from you on her card. I just love that. So I want to do something with that here on my project.
To get complete and accurate instructions on how to use Lawn Fawn's Scalloped Box Card die set (CLICK HERE!) to watch their video. I do not explain in detail how to use it.

I started with cutting the body of the box twice, as instructed, out of Simon Says Stamp Fog cardstock as well as the three center portions of the box. I used 1/8 inch double sided tape to adhere my box together. I then used Darice's woodgrain embossing folder to create a bark-like texture on some Stampin' Up!'s Night of Navy cardstock. From the Navy blue piece, I used the squares and rectangles included in the set to cut out the accent pieces and attached them with 1/2 inch double sided tape.
I then cut three, three inch, pieces of grass from the Lawn Fawn Grassy Borders die into strips and added double sided adhesive to adhere them to the inside portions of the box. The grass was cut from Stampin' Up!'s Pear Pizazz cardstock.

I don't currently own and scalloped hearts frame dies. I know this is something else that will need to be rectified, ASAP. For now, I want a heart for the recipient to look through on my box card. So, I went to my Scan N Cut for some assistance. For a visual of this part of the project, check out the YouTube video I created while making this project.
Scan N Cut Canvas Workshop has many designs free for you to use but I just needed one of the basic shapes. I put regular outline image of a heart inside a scalloped image of a heart and made my own scalloped frame heart for my project. I cut this piece also out of Simon Says Stamp Fog cardstock.
I then began to stamp my images. I loaded up the fox image into my MISTI and stamped it once onto Avery reposistionable label sheet to create a mask for this image. I then loaded some Neenah 110 lb cardstock into my MISTI but instead of inking up the entire image and stamping it, I only partially inked it with the Memento Tuxedo Black Marker. I purposely did not ink the face of the fox. Once it is stamped, the image appears to be looking away from you. I masked the fox with the Avery label material I just cut out and stamped the skunk from the same stamp set right beside the fox in the exact same way. Last but not least I stamped the tiny speech bubble with the heart in the center with Altenew Coral Berry ink.

I stamped the sentiment with Versamark ink and white heat embossed it with Hero Arts Ultra Fine White embossing powder. I cut it out with the rectangle that was designed to go in that front folded down flap. I added a Doodlebug Shaped Sprinkles from their Tiny Hearts.
As far as the sunset goes, well, this is my interpretation of an ink-blended sunset. I think it would also look cool if they were looking out into the stars. I blended Distress Oxide inks in Wild Honey, Abandoned Coral, Faded Jeans, and Black Soot to create my sunset. This was done on a piece of Strathmore Bristol smooth white cardstock. I cut it down with the coordinating piece for that location, which happens to be the wide rectangle. I adhered that piece also with 1/2 inch double sided tape.

Thank you for stopping by my blog today. I hope you have enjoyed it here. Please leave me a comment down below, I love chatting about, well, just about anything.
Koren

A great job on the box card Koren and LF does have a great video tutorial to follow for learning how to put it together easily. A great tip on making your critters without a face for when you want them facing away from you. Yainea does do amazing work and I learn a lot from her work as well.
ReplyDeleteDexter is so adorable...♡ hearing him talk, reminds me of my 4 & 6 y/o grandsons.
Teresa, when I respond to you here, do you get notified? I never respond, because I don't want people to have to come back and look for my reply, lol. Yainea is amazing, I agree. I'm so glad you enjoy watching that little stinker, he has been sick and grumpy, lol.
Delete