Hello fellow card makers. Today I am sharing with you my card for the Your Next Stamp Challenge #69... CLICK HERE!... to play along! This is a sketch and color biweekly challenge. Here is a look at the sketch and color combo for this challenge.
I used Your Next Stamp's Cool Backgrounds to create ink splatter on my card in several of the challenges colors. I stamped it on Neenah 80 lb cardstock. I also accented the side of my card with the Thick Diagonal Edge stamp from Your Next Stamp. To top it all off, I used the Epic sentiment from the What Not Sentiments Eights Stamp set with coordinating die to create my Epic Birthday sentiment. It was stamped on Simon Says Stamp Black cardstock and heat embossed with Simon Says Stamp detail white embossing powder.
Below are photos of my project, a link to my YouTube video creating this card, and links to the products used to make it.
Today I am sharing with you a project that I made using some Avery Elle products. I recently ordered the Avery Elle Beside the Sea stamp set and I could not wait to make this card. I had it all planned out in my head. You know when you have the best idea and you just have to create it, that was this card for me. I wanted to make this sand more than life! lol.
First I started with my background. I masked of the bottom portion of my card front and inked on some VersaMagic Wheat chalk ink. While it was still masked, I loaded up my Ranger marker spritzer with Antique Linen Distress ink marker and Frayed Burlap marker and spritzed some sand on top of the inked area to create sand. It looks so cool! I waited a bit to let that part dry before I masked off the sky portion of my background. I used the MFT mini cloud stencil to ink blend some clouds with VersaMagic Aegean Blue chalk ink. After my background was dry, I cut it down with a Mama Elephant Femme Frames stitched rectangle die. I stamped my sentiment with Versafine Onyx Black ink.
I stamped my images with Momento Tuxedo Black ink because I want to color with my Copics. I used a rainbow of colors to add life to my cabana and kite images. Below you will see a color map listing all of the Copic colors used on this project. Once they were cut out, I popped them up with some foam tape onto my background. To finish it off, I mounted the panel onto some craft foam adhered with 1/2" Scor tape and placed it on a Neenah 100 lb. card base.
Images of my project, a Copic color map, a link to my YouTube video making this card, and links to the supplies I used are below.
Hello fellow card makers. Today is Feature Day and we were challenged to create our own background paper. My oldest daughter who has all A's and B's on her report card, except for Algebra, has to take summer school this year. It's a big "welcome to responsibility" for her. She is a good kid, who is just legitimately having trouble with math. So, I was inspired to create this card for her. I wanted to let her know that despite her having to go to summer school, that she is amazing.
I used the Your Next Stamp School Notes stamp set to create my background paper. Using the Misti for this really makes it easy. I stamped several of the images from the set onto a piece of Neenah Solar White 80 lb cardstock with Your Next Stamp Black Olive Ink. I cut out that panel with the Your Next Stamp Stitched Rectangle Dies. I then stamped a portion of the You Are Amazing sentiment from School Notes in versamark ink and heat embossed it with Zing's Charcoal embossing powder. I also cut this panel out with the stitched rectangles die set. My intention was to coloring the images on the background paper, but I really liked them back and white, so I didn't color them. Finally I white heat embossed the Amazing sentiment from What Not Sentiments eight and used the coordinating dies to cut it out. After some creative adhesive, my card is done.
Photos of my card, a link to my YouTube video creating this card, and links to the products used to make it are below.
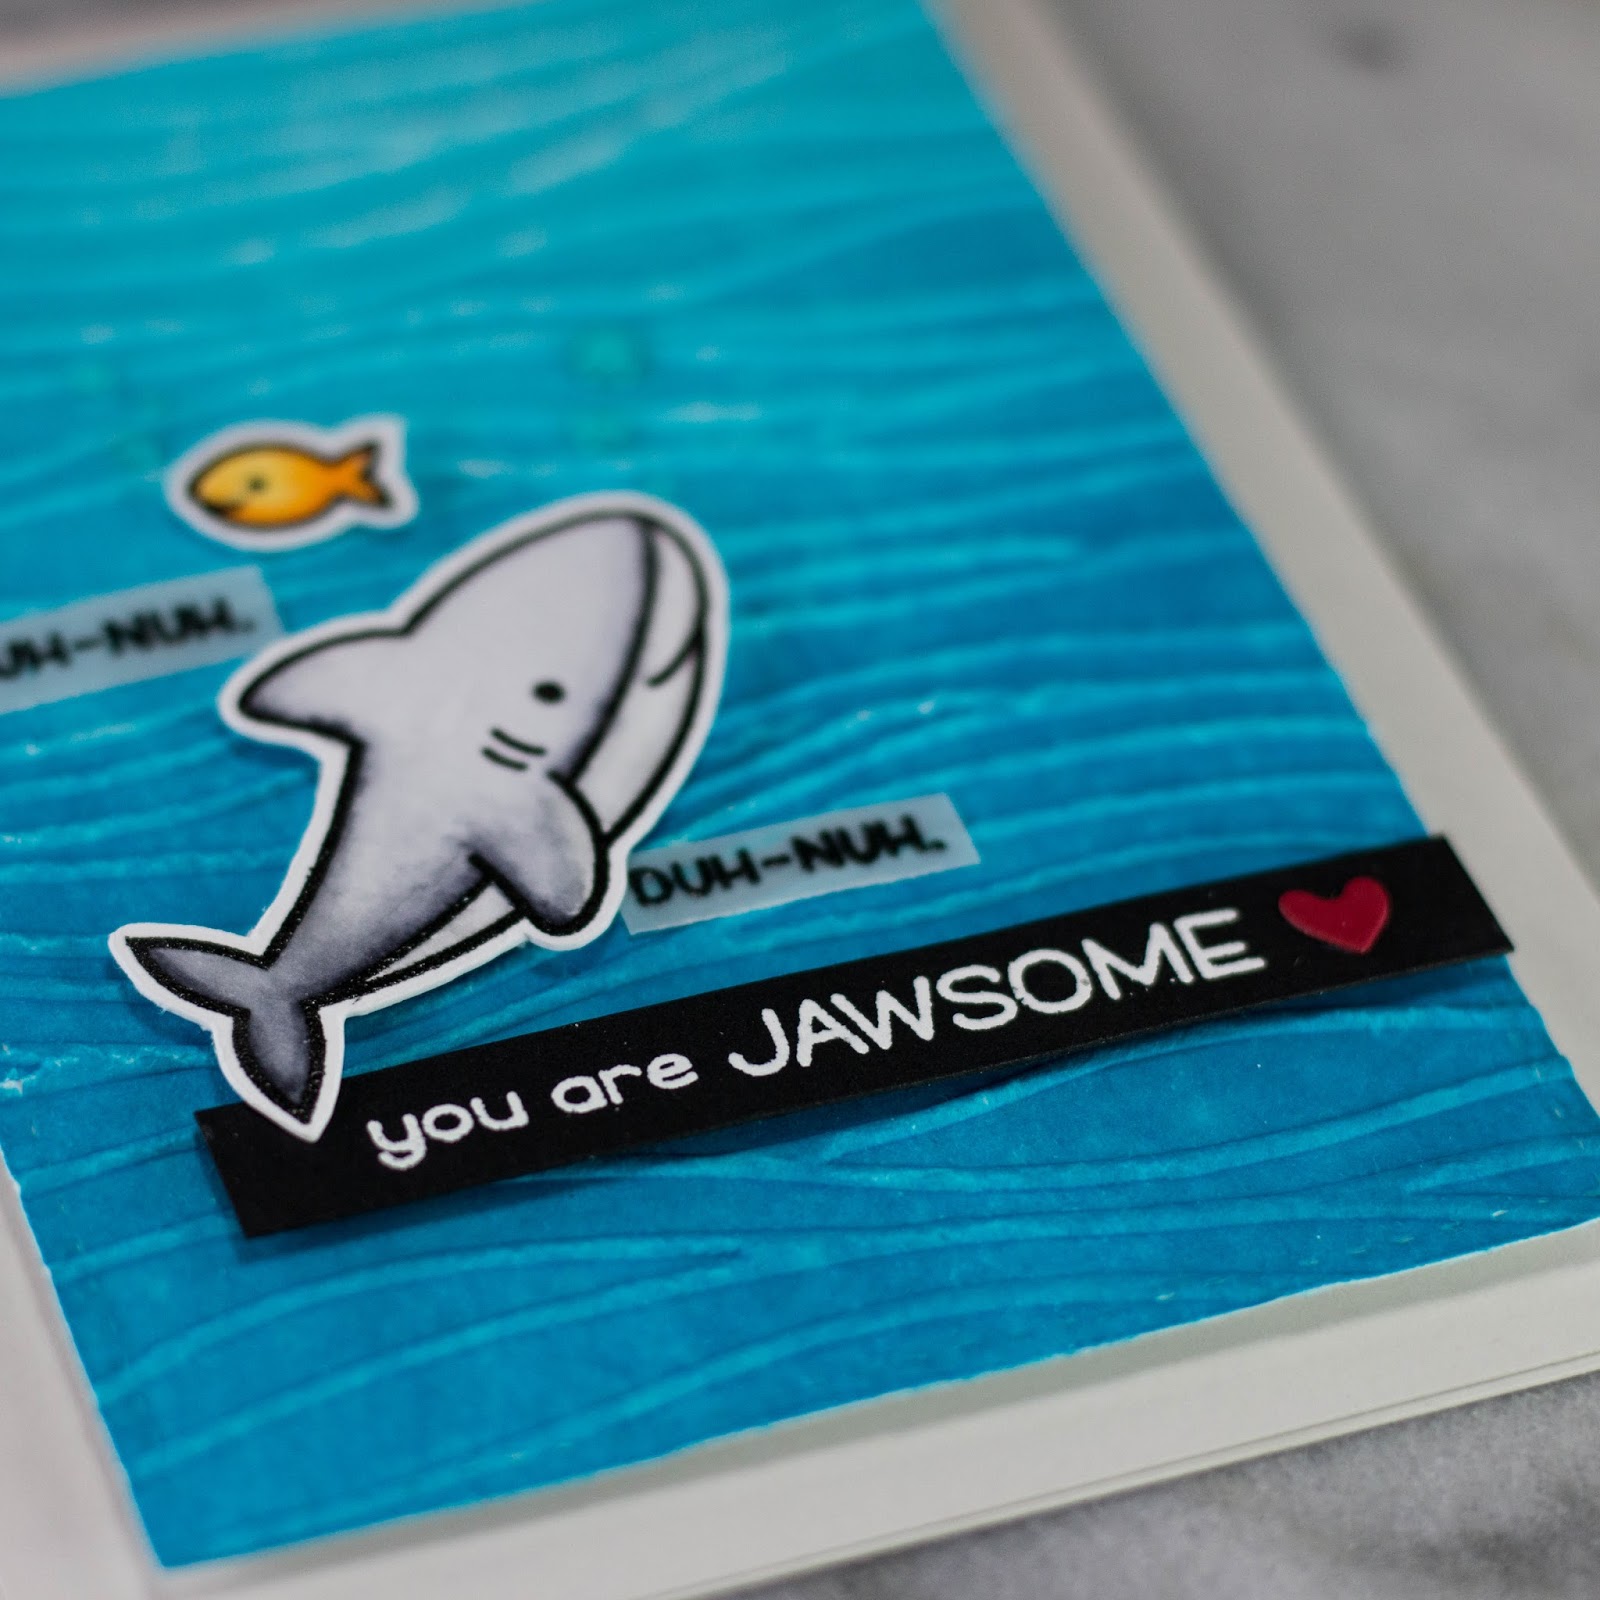
Today I am sharing with you a card I made using Lawn Fawn's Duh-nuh stamp set. My boys have always loved sharks so when I saw this set, I had to make a card with it.
I started with a piece of Bristol Smooth white cardstock. I ink-blended a background with Tumbled Glass and Mermaid Lagoon Distress inks. I then trimmed it down with the Mama Elephant Femme Frames stitched rectangle. I spritzed it with water to give it a distressed look before I embossed it with the Seaside embossing folder by Stampin' Up!.
My images were stamped in Versafine Onyx Black ink and clear heat embossed with Stampin' Up! clear embossing powder. I colored the images with my Zig Clean Color Real Brush Markers. Once they were cut out, I popped them up along with the white heat embossed sentiment with some foam tape. I added a little heart next to the sentiment and some Sea Breeze Blue Nuvo Jewel Drops. I also added a few "duh-nuh's to tuck in beside my images. They were also stamped in Versafine Onyx Black and clear heat embossed onto Vellum cardstock.
Photos of my card, a link to the YouTube video making this card, and links to products I used to make this card are below.
Hello fellow cardmakers. Today I am sharing my card that I created for the Your Next Stamp Challenge #68. To play along with the biweekly sketch and/or color challenge...CLICK HERE!... Here is a look at the sketch and color combination for challenge #68.
As you can probably tell, I was inspired by the sketch this time around. I didn't use any of the colors for the challenge. I also made my card a landscape vs portrait orientation. I used the puffy clouds border die to create my own stencil. I cut the larger of the two cloud dies out of vellum. I have used this same homemade stencil on several projects, and it's a great way to stretch your dies. I ink- blended my cloudy background with Versamagic Aspen Mist Chalk Ink. This is a very pretty blue- gray shade of ink. I love using it for clouds. I then cut my background panel down with the largest of the stitched rectangle dies. I lined up some bold alphabet letter dies to personalize my project with my brothers name. I cut these letters right into my background panel. I will use them to create a camouflaged technique as if my brothers name was written in the clouds. I popped up the letters with some black craft foam. This adds dimension and also creates some shadow behind the letters to make them a bit more legible. I then cut out some layers of clouds to pop up on my card to add even more dimension and interest. I stamped my sentiments on them with Versafine Onyx black ink. The image is from the Just Plane Amazing stamp set. I stamped the plane using Memento Tuxedo black and colored it in with my Copic Markers. I used the Neutral grays to add a bit of shading. lastly I added a little red heart at the end of the bottom sentiment to finish off my card. Photos of my card, a link to my YouTube video making this card, and links to the products I used to create this card are all listed below.
Thank you for visiting my blog today and I hope you will come play along with the Your Next Stamp Challenge #68!
Today I am sharing with you my project for the Your Next Stamp July DT Dare. This month, we were challenged to create with the theme "It's a Guy thing". I am using Your Next Stamp's, Krash the Horse stamp set. As soon as I saw this set, I knew that I wanted to create a race horse card. Maryland is big on horse racing, my mother actually grew up riding and only stopped a few years ago because her knees no longer allowed her to do it. You can find this set as well as the rest of the July re-release by Your Next Stamp... CLICK HERE!... at the Your Next Stamp Store. Don't forget to visit the Your Next Stamp Blog... CLICK HERE!... and be sure to leave a comment on the DT Dare Post for your chance to win a stamp set of your choice.
I created a slider card today. A horse racing slider card... Wooo whoo! I used some Distress Inks in both the original and oxide variations to ink blend my background. I then cut out the front panel of my card using the Your Next Stamp Stitched rectangle die set. I stamped three horses and clear heat embossed them to color with my Zig Clean Color Real Brush Markers. After I cut them out with the coordinating die, I attached one to a slider element by MFT and the others where adhered via foam tape or tape runner in their perspective race positions. The sentiment, also from Krash the Horse stamp set, was stamped with Versafine Onyx Black to finish it off. For Photos of my card, a link to the YouTube Video creating this project, and links to the supplies used, look below.
Thank you for visiting my blog today, and don't forget to visit the Your Next Stamp Blog and leave a comment for your chance to win a stamp set of your choice.
Hello fellow card makers. Welcome to the July blog hop for Your Next Stamp. The sets that are being re-released are absolutely adorable. To find them all ...CLICK HERE! <---- this will take you to the Your Next Stamp store. Your Next Stamp is giving away a $25 gift certificate to one lucky commenter along the hop. You do not have to comment on every blog for a chance to win, but the more you comment, the greater your chances. You have until July 11th at Midnight to comment. The winner will be announced on the Your Next Stamp Blog... CLICK HERE!... Today I have two projects for you, and a video.
Your Next Stamp is also having an awesome sale for the re-realease. Between July 8th and July 11th enjoy 15% off your entire purchase! Use the online code JULY2017.
My first project was made using Your Next Stamp Boom! stamp set and coordinating dies. I cut some letters (L, V, and E) out of Stampin' Up! Cherry Cobbler cardstock using my Brother Scan and Cut and adhered several layers together to add dimension. I then stamped the bomb image using Memento Tuxedo black and colored him with my Copic markers. My intention was to create the word love with the bomb image as the "O". I used the second-largest rectangle from the Stitched rectangle die set from Your Next Stamp as my front panel and placed it on some craft foam using 1/2 inch Scor Tape. I popped it all onto a standard top folding A2 sized card base made from Simon Says Stamp Fog cardstock. On the inside I stamped a coordinating greeting.
My second project for the hop is made from Your Next Stamp's Cat Nap stamp set. It too is being re-released along with many others. I wanted to play with my Prismacolor colored pencils a bit, so I sharpened them up and put them to work. I stamped the cat image on a Toned Grey paper by Strathmore with Ranger Archival black ink. This is my go-to ink when I use my colored pencils. I used a thought bubble from Spellbinders Page Maps, Say What? die set to create a shaker thought bubble for my cat's dream. I stamped and colored the fish image from the same stamp set. I used craft foam to create the shaker well and filled it with Mini Prills like I have on many projects before this. To finish it off, I white heat embossed my sentiment and cut it out using the Your Next Stamp Stitched Rectangles die set.
Thanks for visiting my blog today,
Koren
Thank you for visiting my blog today, Don't forget to check out the rest of the Design Team listed below!!
Hello fellow card makers. Today we are sharing creations using the Your Next Stamp, July Re-realease stamp sets. ...CLICK HERE!... to visit the YNS Online Store. So, These sets are so good, Your Next Stamp is bringing them back for an encore! Remember... leave a comment over at the Your Next Stamp Blog ...CLICK HERE!... for a chance to win a stamp set of your choice.
We are creating projects today with the theme "It's a Girl Thing". Many of you may know this if you follow me, but I'm not great at girl theme cards. I am very much a tomboy card maker. Today I used the Boom! stamp set and coordinating dies to create this festive fireworks card. The background was created using Ken Oliver Color Bursts. This product is so fun, but can also be very messy. As long as you are aware of the possible mess factor, like many products we paper crafters use, you will have a blast (pun intended) creating this fun background.
I started with a 6x6 piece of Canson XL watercolor paper. I used two colors that I though would go well with the "It's a Girl Thing" theme for this background, and I chose Orchid and Turquoise. I strategically placed my color burst powder where I wanted it. After placing the dry power to dry paper I then sprayed water from my mini mister to activate the powder and thats what made this explosion type background. I then cut out several layers from Spellbinders Curved Square dies and used different amounts of foam tape to add dimension. They were placed on a standard top folding A2 sized card base made from Simon Says Stamp Fog cardstock. The sentiment was white heat embossed on Simon Says Stamp Black cardstock and cut out with a Spellbinders page maps speech bubble. The firework image from the Boom! stamp set was clear heat embossed and colored with my Zig Clean Color Real Brush Markers. He was placed on an action wobble to make this card even more fun.
Photos of my project, a link to my YouTube video creating this card, and links to the supplies used to create this card are below.
Hello fellow card makers. Today I am sharing with you a card I made for my Cousin Nikki, for her birthday. She and I are the same age and we had grown up together. We were practically inseparable at family events when we were kids. As we became adults, our family had been disrupted and torn apart. She lived in Delaware and I in Maryland, not too far, but far enough to make it hard to visit regularly. We lost touch and I hadn't seen Nikki since I was pregnant with Cailin 16 years ago. I thought of her often and wondered where she might have ended up. Before social media, it was a lot harder to keep in touch with people, and it took effort and documentation of some sort, lol. I had often spoke with my husband about how to find her or what it would take to find her. Well, last week, out of the blue, I got bombarded with inquires about this post on a local yard sale site through Facebook.
Since seeing Nikki last, I had gotten remarried and changed my last name. She couldn't search for me like all of you can. She found a photo that I used on my old blog with my old last name. So she posted it on Facebook and within 30 mins, friends of mine where messaging me asking me who this was trying to find me. I was in instant tears. My cousin had found me, all this time looking for each other and Facebook helped us find each other again.
Do you know where she was... 5 mins away from me in the next town over!! Can you believe that?? We got together on Fathers Day to visit my Dad whom I lost in 2005 at the cemetery, where most of our family is buried. I am so happy to have her back in my life. I won't be letting her slip away this time. I'm older, and wiser... and I have social media!! I wish her the happiest birthday and I'm so glad I get to celebrate with her again.
Now, for her card! I used Honey Bee Stamps and Pretty Pink Posh products on this one. I made a shaker card, well, because it's fun. I ink blended a honey comb background inside the shaker and layered some die cuts for the sentiments pun. I placed some sweet little black and white shaded bees on the outside of my shaker and called it done. Photos of my card, a link to my YouTube video, and links to the supplies used are below.
Hello. My name is Koren Wiskman, but many people call me Kori. My husband Tim and I run two businesses and have four kids. If this doesn’t immediately scream insanity, just keep reading…Tim and I grew up in the same waterfront town of Pasadena, Maryland. We graduated High School together in 1998, and about 15 years later we started dating. It would make an excellent love story, but we are not quite finished writing it yet. I became a Mother almost 20 years ago with my daughter Cailin. I’ve been crafting since birth but I discovered stamping when I was pregnant with my first son Hayden over 18 years ago. I fell in love and I have been card making ever since. Since then my joy for paper crafting has grown right along with my family. I now have a step-daughter Olivia who will be 13 this year. You can find me on YouTube and many of the popular social media sites. Thats where you will also meet Dexter my youngest, he is seven, and he is the perfect combination of me and Tim. See many of our family outings and shenanigans as well as plenty of crafting goodness.