Saturday, March 10, 2018

Your Next Stamp March 2018 Preview Day

Hello fellow card makers.

Today is Preview Day over at Your Next Stamp. I have seen the March release and it is fabulous. I have to say that it is my favorite so far of all the releases I have been blessed to be a part of. I couldn't even pick a favorite from it, but if I had to... I'd have to say tomorrows blog hop card is my favorite. Just wait until tonight 10 pm Est.

As for my preview project, I am using the brand new Puddle of Fun stamp set and some super fun new dies. To see the rest of the previews (CLICK HERE!) to visit the Your Next Stamp blog and check out what the rest of the design team came up with.


I started wit a piece of Neenah 110 lb Solar White cardstock. I used the My Favorite Things Mini Cloud stencil to ink blend some clouds with Versamagic Aspen Mist ink. This is my favorite ink to use for clouds. It is a soft blue gray. Now for the fun part- I used the brand new Your Next Stamp Raindrops die and blank stencil sheets from The Crafters Workshop to create my own stencil. I used my homemade stencil to ink some rain drops also using Versamagic Aspen Mist ink. After I inked them, I used Nuvo Glimmer paste in Moonstone to add texture and dimension. Not to mention, a ton of sparkle. I cut this panel down using the second to largest Your Next Stamp Stitched Rectangle die and adhered flat to a Simon Says Stamp Fog card base with tape runner adhesive.


I cut some border clouds that I wanted to be popped up at the top and the bottom of my front panel. I used the Your Next Stamp Puffy Clouds Border die to do this. I also used the same stitched rectangle die to cut down my clouds and to continue the stitching detail throughout the panel. On the bottom border I stamped my sentiment from the new Puddles of Fun stamp set in a rainbow of Distress Oxide inks. I used Candied Apple, Wild Honey, Squeezed Lemonaide, and Faded Jeans. The lower part of the sentiment was stamped with Versafine Onyx Black ink. Both the top and bottom cloud borders where adhered to my card using Scotch 3M foam tape.


I stamped the adorable chick image wearing boots and looking down into a puddle with Your Next Stamp Black Olive Ink and colored it using my Copic Markers. I also used my Faber Castell Goldfaber colored pencils to add some shading. I used the coordinating dies to cut him out. This die is awesome because it cuts out the space between the chick and the puddle. I popped my image up with Scotch 3M foam tape.

The sun that you see in the upper right corner of my card is the brand new Starburst die set by Your Next Stamp. I cut it from Papertrey Ink Summer Sunrise cardstock. and popped it up using foam tape. I think it adds to the sentiment I chose. The combination of rain and sun and the rainbow, I just love how it turned out.


Thank you for visiting my blog today. Don't forget to check out the rest of the design teams projects over at the Your Next Stamp blog to get more previews of tonights release. (CLICK HERE!) Join us tonight March 10, 2018 at 10pm EST for the March New Release Blog Hop

Koren

Saturday, March 3, 2018

The Heffy Doodle Hey Cheese Card Video

Hello fellow card makers.

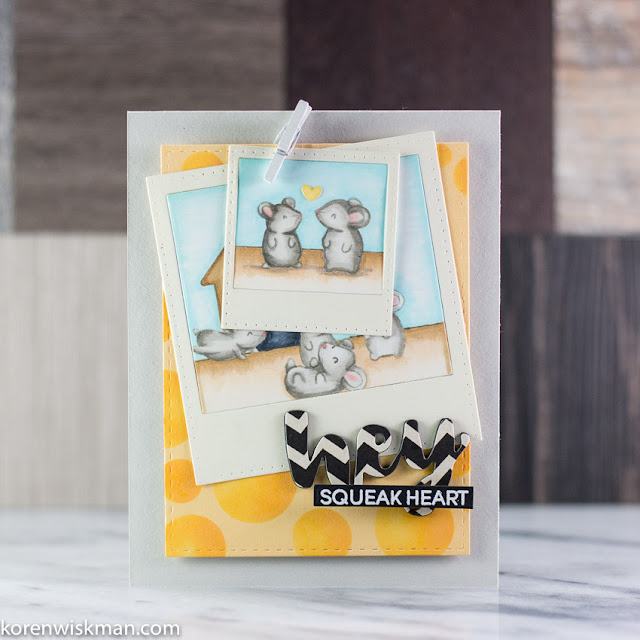
Today I am sharing a card that I made using Heffy Doodle stamps and dies. I couldn't resist the new Hello Squeakheart stamps and thats what I'm using on my project today. I also picked up a few more things from Heffy Doodle to use on today's project.


I started with a piece of Stampin' Up's! So Saffron cardstock cut down using a Stitched Rectangle die from Your Next Stamp. I brought out my Kaiser Craft Bubbly stencil and some Wild Honey Distress Oxide ink to make some cheesy background patterned paper. I ink blended a few circles scattered around the soft yellow cardstock to mimic the look of cheese.

I cut both dies from the Your Next Stamp Insta Love die set in Stampin' Up's! Very Vanilla cardstock. I cut the same dies also from Neenah 110lb. cardstock, which is what I like to use with Copic markers. The interior portions of these dies will be what I use to stamp my images on. I want it to look like a stack of old polaroid photos clothespinned to the front of my card.


I stamped my images using My Favorite Things Hybrid ink in the color Cement Gray. I wanted to try some no line copic coloring today. This ink is fairly faint and does a great job at disappearing while still allowing you to see what you are doing. I used both my Copic markers and my Faber Castell Goldfaber colored pencils to color and shade my images.

Once my images where colored, I attached them to their coordinating polaroid with tape runner adhesive and a piece of typing paper. This technique allows me to make the polaroids all one piece, which makes it easier to adhere to my card base. I popped up the first layer, the cheese panel, with black craft foam and 1/2 inch double sided tape. I adhered the rest of my panels flat with the double sided tape. The clothespin at the top is simply for show, everything is securely fastened. As a finishing touch, I added a little yellow heart from Doodlebugs Shaped Sprinkles set of Tiny Hearts. I love adding these hearts to my projects.


I cut out the Hey, Heffy Cut die from a piece of patterned paper from Fancy Pants, Park Bench paper pad. It is a black and off-white chevron pattern. I then cut out the same die a few more times from Simon Says Stamp Black cardstock. I adhered them all together with Ranger Multi Medium Matte liquid adhesive. Once it was dry I used the same liquid adhesive to adhere it to my card front. The sub-sentiment was stamped in Versamark ink and white heat embossed with Hero Arts Ultra Fine White Embossing powder. I used the super fabulous new Strips of Ease die set from Heffy Doodle to cut out my sentiment. These dies really make it easy to line up and cut a straight sentiment. I used foam tape to pop up the sub-sentiment strip in place.

Thank you for visiting my blog today,

Koren


Friday, March 2, 2018

Your Next Stamp Challenge #84

Hello fellow card makers.

Today I am sharing with you, my project for Your Next Stamp's Challenge #84. Your Next Stamp holds a biweekly sketch/color combination challenge on their blog. (CLICK HERE!) to check it out, play along, or just to see what everyone else is creating. Here is a look at this week's sketch/color combination.


I was more inspired by the sketch this week than the color combo. I started by creating a card front that mimics the sketch. I took a piece of Papertrey Ink's Smoky Shadow cardstock and cut it down using the Your Next Stamp Stitched Rectangle dies (second from largest). Then, I took the largest Reverse Scallop die from the Your Next Stamp set and cut two "windows", both out of the front of the panel to look like the sketch. I then took a piece of Simon Says Stamp Fog cardstock and cut it down the same way. I used a pencil to mark the center of the boxes on the fog piece. This will help me stamp where the holes in the front panel will show through. I stamped the middle starburst from the Your Next Stamp Starburst Backgrounds with multiple Distress Oxide Inks. I used Twisted Citron, Broken China, and Faded Jeans.


After stamping the starburst, I needed something to fill the space on the lower third of the card front. I have been playing around with creating fonts on my Brother Scan N Cut, so I imported some text using the Brother Scan N Cut Text Converter and welded some text together in Canvas Workspace to create my own word. I made the word "Stinker", which is what we call Dexter. I cut the word from Simon Says Stamp Fog card stock three times and layered them together using Ranger Multi Medium Matte liquid adhesive. I used sponge daubers and the Distress Oxide inks listed above to create and ombre of ink on the word "Stinker". I adhered it to my card front also using liquid adhesive.


The sub-sentiment is from the Cool Tag Banner Sentiments stamp set. I stamped it in Versamark ink and white heat embossed it with Hero Arts Ultra Fine white embossing powder onto Simon Says Stamp black cardstock. I cut it out using Heffy Doodle Strips of Ease dies and popped it up with a thin strip of foam adhesive.


I stamped my images from one of my first Your Next Stamp stamp sets called Waddles Beach Fun in Black Olive ink. Your Next Stamp Black Olive ink is a Copic friendly ink. I colored my images using Copic markers and Faber Castell Goldfaber colored pencils. I have been having fun using the combination of the two coloring mediums. The colored pencils are used at a minimum to add depth and shading to a few areas. For the most part, the images are colored with Copic markers. These images were added in the open areas in front of the starbursts with liquid adhesive.


The front panel was covered with Scotch 3M foam adhesive and popped up onto the card base. The card base is made from Simon Says Stamp Fog cardstock. I added some Your Next Stamp Love Earth Gumdrops to fill some of the space on the card.

Thank you for visiting my blog today. Please considering playing along with us over at the Your Next Stamp Blog (CLICK HERE!)

Koren