Today I am sharing my project for the Your Next Stamp March Release Design Team Dare. We were challenged to create a project around the theme "whats up" and I used the brand new Your Next Stamp What Not Sentiments 12 set to create my project. This set is filled with awesome sentiments. Make sure you (CLICK HERE!) to visit the Your Next Stamp blog. Every commenter has a chance to win a stamp set of their choice from the Your Next Stamp online store.
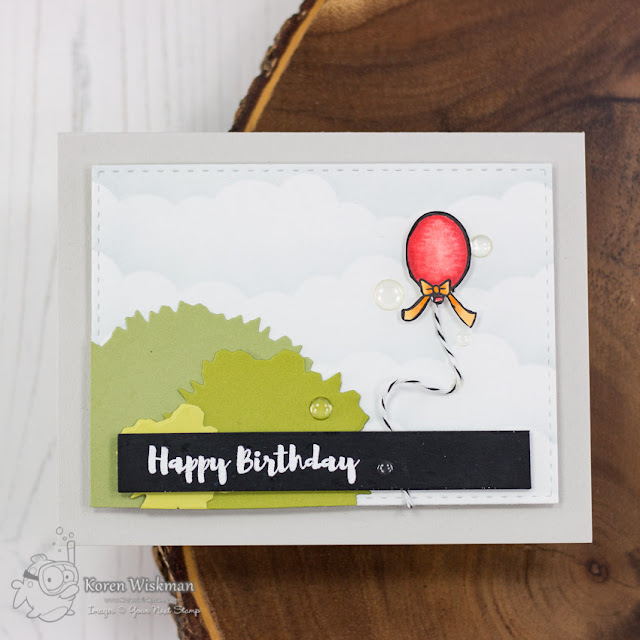
The idea behind my card was to use the balloon image to create that one balloon that always seems to get away and float all the way up into the atmosphere. That one balloon that is so popular that everyone stops and stares into the sky to watch it fly far far away, lol. I'm not sure if I captured the idea or not, but you can be the judge.
I started with a piece of Neenah 110 lb cardstock and ink blended some clouds to create the sky using MFT's Mini Cloud Border stencil and Versamagic Aspen Mist ink. I cut this panel down using the Your Next Stamp Stitched Rectangle die (second from largest). I then took the brand new Ripped Rectangles dies and cut all three from three different shades of green cardstock. I used Stampin' Up! Pear Pizazz, Papertrey Ink's Simply Chartreuse and Limeaide Ice. I wanted them to look like the tops of trees. I adhered the tree tops to my card panel with double sided tape and trimmed of the excess hanging off with my large Tim Holtz scissors.
I stamp masked one of the sentiments from the What Not Sentiments 12 stamp set to only ink up the "happy birthday" using Versamark ink. I then heat embossed it using Hero Arts Ultra Fine white embossing powder. This was done on Lawn Fawn Black Licorice cardstock. I cut down the sentiment into a strip using the Heffy Doodle strips of ease die set. I popped up the strip using foam tape towards the bottom of my card front.
I then stamped my image of the ballon from the What Not Sentiments 12 stamp set. I hate fussy cutting, but I did the best I could. I colored it with my Copic Markers and added a string of Papertrey ink True Black twine as the string that I was not about to fussy cut out. I popped it up on my sky panel using Scotch 3M foam tape.
To finish off the card I added a few Clear Gumdrops also by Your Next Stamp to add a little more interest to the card. Like always, I added it to a Simon Says Stamp Fog card base. I feel like it is a little blank but I'm not sure what else to add. Maybe you could leave me some ideas in the comments below.
As a bonus I have a second project using some additional Your Next Stamp supplies to see it, click the link to my YouTube video to watch. In it I use thin foam used to create flowers and my heat tool to make the daisys you see pictured on my card above. I use a technique I learned from Yana Smakula and a video she did with Spellbinders on their YouTube channel. To see that video (CLICK HERE!)
Thank you for visiting my blog today and make sure you stop over to the Your Next Stamp blog and leave a comment for your chance to win a stamp set of your choice from the Your Next Stamp store. (CLICK HERE!)
Koren


Wonderful cards :)
ReplyDeleteCute cards. What a clever idea to make the trees on the first card!
ReplyDeleteThese are two cool cards !
ReplyDelete[margessw(at)icloud(dot)com]