Monday, April 29, 2019

Heffy Doodle and Chibitronics Blog Hop


Hello everyone. 

Today is the Heffy Doodle and Chibitronics Blog Hop. I love it when we get to play with Chibi, it always challenges me creatively, and today is no exception. A full list of blog hop participants are listed below. We are using Heffy Doodle products along with a Chibitronics starter kit to create our projects for today's hop.

Don't forget to comment along the hop for your chance to win Prizes: Chibitonics Starter kit & £50 HeffyDoodle Gift Certificate. Giveaway closes May 4th 2019 Midnight EST. Two winners will be announced May 6th, 2019 on the Heffy Doodle Blog.

For more information on Chibitronics (CLICK HERE!)


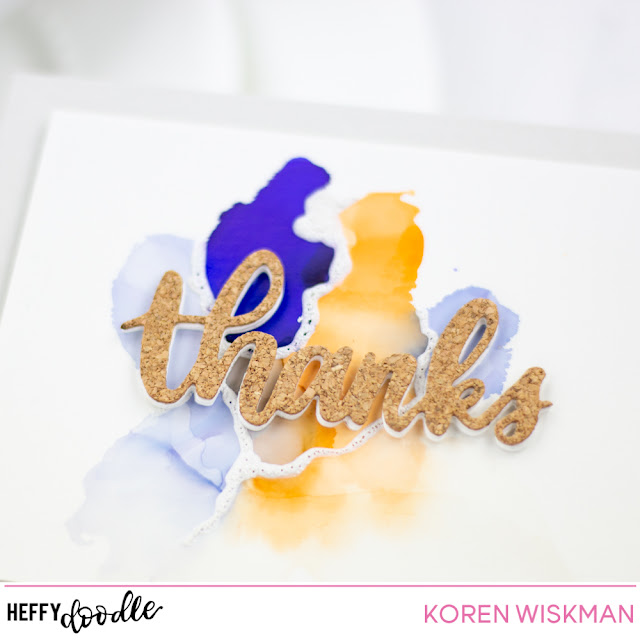
For my project, I started with a piece of poster board that I was encouraged to buy from my friend Mary Polanco of Mary Polanco Designs. (CLICK HERE!) to visit her YouTube channel. I bought my two 18 x 24 inch poster board sheets from AC Moore. They were $1 dollar each and after I cut them down I had 15 card fronts that measured 4 1/4 by 5 1/2.

I'm sure you are asking me, why do I care? Well, one side of the poster board is semi-glossy and you can use your alcohol inks on it. I used Ranger Alcohol Inks in Amethyst, Peach Bellini, Gold Mixative, and Cool Peri, along with some Ranger Alcohol ink blending solution. I applied my inks in very small amounts, only using maybe two drops at any one time. Making sure that I move it around until the alcohol in dries in place. I started with the lightest inks first and made my way to the darkest of shades that I intended to use. If I didn't like how an area had blended together, I used the blending solution to thin out the color in that area. Always making sure to keep the inks moving until they stop dead in their tracks.


When adding the Gold Mixative I almost always add it along with blending solution. I just find that it looks better to me if I use it that way. 

I made several panels using these shades. I absolutely loved how the inks looked on the poster board. I did make sure that I did not get the alcohol inks near the edge of the panel. I wanted to keep the edges of this design white and the inks, if used on the edges, will seep in-between the layers of the poster board and make the edges run unnecessarily. To avoid this I will always cut a slightly larger piece of poster board than what I intend to need. Although, I'm sure if you intend to saturate your panel with lots of ink, you might want to use regular Yupo paper, but this is a great option for any budget. 


I took the most interesting of panels that I had made and chose it to be the background for today's card. I enjoyed how this one blended together. I also cut down the panel to 3 1/2 by 4 3/4.

To prepare the panel for the Chibitronics I ran it through my die cutting machine to cut two small holes that will eventually be under my alcohol ink "world" (I will explain why I did this below). I used the reinforcement hole die from the Heffy Doodle Tag Along Dies set. The alcohol ink "world" was cut using the Heffy Doodle Imperial Stitched Circles die set.


I also cut the smallest cloud from the Heffy Doodle Swirly Clouds die set. This cloud was cut from the same white poster board that I made the background from. I wanted the whites of the front of the card to match.

While I was die cutting I also cut the Heffy Doodle Heffy Cuts word die "thanks" from Die Cuts With A View's "Cork". This is a 6x6 paper pack that I have had in my stash for a very long time and I am so glad I do. I also cut the "thanks" word die from the same white poster board three additional times to create some layers to sit under the top cork layer. I used Nuvo Deluxe Adhesive to adhere these layers together.


I also took this opportunity to stamp inside of my card, and I used the sentiment "you light up my world" on the inside of a Simon Says Stamp Fog Card base. I stamped this sentiment using Versafine Clair Nocturne Ink. I love how this all came together. 

I also used one of the other panels that I had created with the alcohol inks to make a second card. Even though it is really cool that the the first card lights up, I really like the simplicity of this second card. 


To add some additional interest, I used Tonic Studios new Stone Drops in Chalk White along the seams of the inked sections of my card panel. I did this with both panels. I just made lines with the material constantly adding them to the paper with consistent low pressure. Make sure you save this step until all of the die cutting is done. You do not want to squish this beautiful texture in your die cutting machine.

To put the lighted card together I knew that I wanted to run things a little differently, so, I laid out my circuit onto a piece of cardstock, with the battery/switch in the lower right corner, where it felt natural for a thumb to depress the switch without seeking out a hidden location. I ran the copper tape along the cardstock, and then laid out my foam tape, around my circuitry. Remember those two holes in my inked background? Well, through those holes, I brought up the copper tape from the lower "level". I completed the circuit directly on the background, using both a blue and red LED to give me an intense purplish color. I then "capped" the lights with my planet, forcing the light outward from underneath its canopy.


The "thanks" word die cut was added with Tombow Extreme Clear Adhesive tabs. If you look closely to the picture you can see the gel like substance holding up both the word die and the sentiment strip below it.

The sentiment strip is also poster board stamped with a Heffy Doodle Freebie stamp that says "you are amazing". I stamped it with Nuvo Clear Mark Ink and heat embossed it with Hero Arts Gold embossing powder. I used my Heffy Doodle Strips of Ease die set to cut it out.

The second card was put together much easier. I just added my word die cut with Nuvo Deluxe adhesive to the alcohol inked panel. I popped up the panel itself and also added it to a Fog card base using white craft foam and Scrapbook.com double sided adhesive.


I placed a single white Doodlebug Shapped Sprinkle Tiny Heart on the top layer right above where the switch is located. This will indicate where to touch for the lights to come on.

When turned on the red and blue light combined make a purple hue to match the amethyst color in the card. I wish I had a rainbow of colors to light up a card. Everyone is always amazed at an interactive card but there is something to love about a clean and simple card as well.

I want to thank you for reading my blog today. Don't forget to comment along the hop for your chance to win.

Koren


Koren Wiskman ( You are here)


Saturday, April 27, 2019

Power Pack Mega Blog Hop Using Jane's Doodle's


Hello everyone.

It's a Power Pack Mega Blog Hop for Pear Blossom Press. Welcome! My name is Koren Wiskman and this is my blog. I can't speak for you, but I was super excited to hear that Amanda had created a switch to help make learning how to light up your greeting cards that much more simple. I love creating interactive cards, but they take up a lot of time, and time is a precious commodity in all of our lives. This Power Pack helps me get the job done, and faster than ever before.

(CLICK HERE!) To visit Pear Blossom Press and read more information regarding the Power Pack.

Customers in the US can enter the code FREEUSA to receive free shipping on orders over $9 until May 11, 2019
International customers can enter the code INTL5 for $5 off International shipping until May 11, 2019


I started my project with a piece of Ranger Watercolor paper and I coated that paper with Distress Oxide inks in Salty Ocean, Mermaid Lagoon, and Stormy Sky using my Ranger Distress Ink Blending Tools. I made sure it was good and saturated before moving on... then I took it to my sink and ran it under water. 

Yup, you heard me right. I ran it under water. I dunked it right under a slow stream of running water. This was not my idea. I learned this in a class I took with Neat & Tangled last week. You can find out more about there upcoming classes as they are announced on their website (CLICK HERE!) 

So this technique reacts differently depending on the type of medium you use. With this project the Distress Oxides inks that were ink blended onto the watercolor paper sat on top of the paper long enough for me to rinse some off and wash it away. It left behind almost a Tye Dye effect on the paper. If you use different types of watercolor, different reactions will occur. 

I loved how this looked like the movement of the ocean. So, kept this panel and sprayed it down with my shimmer sprays to add a ton of shimmer to the background and the liquid from the spray left behind even more water like shapes that kind of look like bubbles. 


I cut the top of this panel with Lawn Fawn Stitched Waves Border Dies and trimmed the rest to measure around 3 1/2 by 4 3/4. 

For the sand, I started with a piece of Stampin' Up! Sahara Sand. I took my Ranger Distress marker Sprayer and some Distress Markers and sprayed the card panel with Antique Lined, Pumice Stone, Walnut Stain, Vintage Photo, and Frayed Burlap. I cut the panel down to size and used a Heffy Doodle Stitched Slopey Joes Dies to cut the top. To finish up  this panel, I stamped the sentiment "Oh Ship, it's your birthday" onto the center-ish with Versafine Claire Nocturne ink.


I used Jane's Doodles "Oh Ship" stamp set for this card. My images were stamped with Simon Says Stamp Intense Black ink and colored with my Copic Markers. I also supplemented some additional sea surroundings with the Heffy Doodle Oceans of Love stamp set. I either used the coordinating dies to cut them out or my Brother Scan N Cut, if I didn't have the dies.

"Push Here" was stamped with Nuvo Acorn Brown Ink using Heffy Doodle's Interactively Yours stamp set. I made sure to stamp it where I knew the switch was going to be. This way the recipient knows that this card is interactive.


So- the most intimidating thing for the light-up cards always seems to be the actual components that make the card light up- the copper tape, battery and light.  The power packs from Pear Blossom Press take a lot of that frustration away by eliminating the creation of a switch out of foam/cardstock.  These are now super easy- just secure the switch assembly to the background or card base, run the self adhesive copper tape in a manner that will be covered by your images (I like to cut the copper tape length-wise, but this is not even necessary), and attach the self adhesive LED on top of the copper tape- and its time to test the circuit, and begin assembling your card.  It really is as easy as it sounds.

I placed a large Glue Dot on top of the battery pack and covered the rest of the available space with double foam tape in order for the sand to sit flush with the switch. The sunken boat is also popped up with double foam tape at the bottom, allowing space for the bright white light to shine behind it. Under the "top" of the boat I used Tombow Extreme Adhesive clear Tabs. The clear adhesive allows as much light as possible to shine past the edges of the images and cardstock. The rest of the images where adhered using either Scotch 3M foam tape or Nuvo Deluxe adhesive, depending on if I wanted them to pop up or not. 


Once I had the rest of my images where I wanted them, I mounted the entire assembly onto a piece of Simon Says Stamp Fog card stock and called this one done, and immediately began playing with my new toy!

Thank you for visiting my blog today. I hope you will be inspired to create light up project of your own using the NEW Power Pack from Pear Blossom Press. 

Here is a full list of the participants in the Power Pack MEGA Blog Hop. I hope you will hop along and check out what everyone else has created with this genius addition to our light up interactivity repitore.


Koren Wiskman (you are here)

Scrapping for Less April Kit Blog Hop


Hello everyone.

Today I have a unique video for you. I was given the opportunity to play with the Scrapping For Less Subscription box Flavor of the Month. It's so cute. It's a card kit that has four different kits in one. Plus you have the option to add additional stuff to your "Double Scoop", called the "Banana Split". This confused me at first but once you (CLICK HERE!) and visit the Scrapping For Less website and click on Subscriptions, it will have all the information for you.


They even give you inspirational sketches for ideas on how to use the products inside the box. You will find it as well as a list of everything included in both the "Double Scoop" and the "Banana Split".

Or... you can watch my video and see what is inside. The video as well as some project ideas are linked in this post.


Make sure you (CLICK HERE!) to visit the Scrapping For Less website and blog and to see all the information about the awesome subscription box.

Thank you for stopping by my blog today.

Koren

Next on the Hop is Teresa (CLICK HERE!) 


Saturday, April 20, 2019

Heffy Doodle Tea Dogs Card Video


Hello everyone.

Today I am sharing with you my latest video for Heffy Doodle. I am creating a cute UK inspired greeting card. I saw another project somewhere on the internet that inspired me to create this one, but I can't find the project and I can't remember who created it.  I want to credit them, but I am a terrible blogger and didn't document my sources- so, thank you for the inspiration.


Luckily, I'm sure I will be forgiven for creating and sharing my version anyway. The fun and whimsical nature of the stamped images and lettering allow for some design liberties that help make this design more fun. It doesn't matter if everything is straight and it doesn't matter where the images are. The scene is a more open canvas with this type of card and I enjoyed creating it. Thank you again to the person that inspired me.


I will link below the YouTube video that I made while creating this card project, as well as all of the supplies used to make it. I also have a Copic Color Map for you. It lists all of the markers I used to color my images.

I want to thank you for stopping by my blog today.

Koren

Friday, April 19, 2019

Neat & Tangled April Release Day Five Wrap Up


Hello Everyone.

The April Neat & Tangled Release is now LIVE and available for purchase in the N&T Online Store. (CLICK HERE!) to be instantly transported to the shop.

I just can not pick a favorite from this release. I enjoyed playing with the entire release so much. All of my extra images were taken by my son Dexter and made into cards. This release is fantastic.


The ideas are always limitless for me with such whimsical stamp sets. Any color combo and any background works when you are using imaginary images.

I hope you like this month's release as much as I did (CLICK HERE!) to visit the Neat & Tangled Online Store and see the entire release for yourself and see a ton of images from the design team using these sets.

Thank you for visiting my blog today. I have linked below all of the above posts for your convenience.

Koren


Thursday, April 18, 2019

Neat & Tangled April Release Day Four

Hello everyone.

Day four of Neat & Tangled's April Release week is an anything goes day. We were asked to make a project featuring anything in the April Release that we wanted. I chose to work with the NEW To The Stars Stamp set. I just love the fairies in this set. (CLICK HERE!) to visit the Neat & Tangled online store and blog for more inspiration using the NEW April Release. Comment on the Design Team Member's Blogs for your chance to win a $25 gift card to the Neat & Tangled Online Store.

The Neat & Tangled April Release will go LIVE Friday the 19th at 8am EST. 

When I first sat down to make this card. I really thought about my vision of a fairy. My first exposure to fairies was from Disney both from the infamous Tinker Bell and Peter Pan but also from Sleeping Beauty and her three loyal fairies Flora, Fauna, and Merryweather. So my project today was inspired by them, it's my way of updating them to a more urban fairy.


I started with my background per usual. This is a piece of Neenah 110 lb Solar White cardstock. I used my Spellbinders Platinum Die Cutting machine to emboss some bricks in the background. The only problem was, I didn't really want the bricks everywhere in the background. I just wanted it outside of a centered oval of black space. That should be easy right. It is, after you figure out that to put more pressure on an area outside of a negative space gives you the ability to emboss only that outside area. So, I made a piece of Tonic Studios Grey Board to die cut an oval from the center. This piece measures 4 1/4 by 5 1/2 inches. I added this to my embossing sandwich. This is not recommended by the manufacturer so, follow this instruction, at your own risk. Remember never to force a sandwich that is too thick through your die cutting machine. You may have to find a sandwich that fits nicely in your own die cutting machine to get this to work properly for you.

Using the above technique I embossed The My Favorite Things English Brick Wall stencil on the outside of a centered oval leaving the perfect space to do some ink blending. I used Distress Oxide Inks in Candied Apple, Twisted Citron, and Salty Ocean to blend with my Amazon Makeup brushes. I used one of the smaller brushes to blend three areas of each color. This will be where my fairies are on the front panel.


I then stamped the sparkle image included in the Neat & Tangled To The Stars stamp set with one of the plates from the We R Memory Keepers Precision Press. I used the same oxide ink that I used to ink blend with. I then took my background to my splat box and sprayed the background with Imagine Crafts Frost and Sparkle shimmer spritz as well as Hero Arts White Iridescent Shimmer Spray. This gives you mega shiny background. 

My images were stamped with my We R Memory Keepers Precision Press with Simon Says Stamp Intense Black ink onto Neenah 110 lb Solar White cardstock. I colored them using my Copic Markers. Below I will leave my Copic Marker Color Map for you to see the markers used to color these images. The blue fairy is actually the one sitting atop the moon in the To The Stars stamp set. I partially stamped her and drew in some linework to make it appear as if the arm that originally got cut off behind the bunny is now going behind her back. I placed her on top of the sentiment strip as to not have to draw her another leg. It wouldn't have gone very well, lol- so I was happy that this worked out so well. I also used the Copic Multi Liner to add some interest to her dress with an empire waist. 

https://www.shareasale.com/r.cfm?b=900429&u=1535136&m=67327


As for the sentiment, I stamped the "hello beautiful" sentiment also from the To The Stars stamp set which was perfectly fitting for a Sleeping Beauty inspired card. It was stamped onto Lawn Fawn Black Licorice cardstock with Nuvo Clear Mark embossing ink and heat embossed with Ranger White embossing powder. I used my Fiskars paper trimmer to cut it down and Scotch 3M foam adhesive to pop it up onto the background.

Each of the ladies were also popped up using Scotch 3M foam adhesive in their perspective areas. I enhanced their wings with some Ranger Unicorn Stickles and dressed them up a bit adding Nuvo Crystal Glaze to their clothing.  This panel was cut down to 3 1/2 by 4 and 3/4 and attached to a Simon Says Stamp Fog card base using Scrapbook.com double sided adhesive tape rolls and white craft foam.

I hope you enjoyed todays project. Don't forget to (CLICK HERE!) and visit the Neat & Tangled blog and check out what the rest of the design team was inspired to create with the NEW April Release. This release will go LIVE tomorrow Friday April 19th at 8am.

Thank you for visiting my blog today.

Koren

Wednesday, April 17, 2019

Neat & Tangled April Release Week Day Three

Hello everyone.

Today is Day Three of Neat & Tangled's April Release Week. We are showcasing the NEW Receding Background, which is available in this release. This background is super cool. It reminds me of heat waves or sound waves or even ripples on a pond. This background is essentially repeated hand drawn circles, which are perfect for magical backgrounds like the one I'm making today. To see what the rest of the Design Team has created using this product (CLICK HERE!) to visit the Neat & Tangled blog and see today's post. Comment on as many of the design teams  posts as you can for your chance to win a Receding Background stamp from the April Release.

The Neat & Tangled April Release will be available this Friday April 19th at 8am EST.


As for my project, I started with a piece of Papertrey Ink's Spring Rain cardstock. I loaded it into my We R Memory Keepers Precision Press as well as the NEW Neat & Tangled Receding Background Stamp. I first removed the foam from the inside of the press because this stamp is red rubber and the foam is not necessary. The foam padding is built into the cling mount of the red rubber stamps which give the compression relief needed for a good impression. I love red rubber background stamps because they stamp so well and are great for so many techniques.

Today, I am just heat embossing this stamp using Nuvo Clear Mark embossing ink and some Simon Says Stamp Clear embossing powder. This leaves a tone on tone effect with the darker blue being the stamped and heat embossed image.


I then wanted to ink blend a darker, more dramatic background so I used Distress Oxide ink in Chipped Sapphire and Black Soot. I love using my Nuvo Blender Brushes to ink blend my backgrounds with and that's what I used on this project.

I also wanted to have some more interesting stars in the background. To do this, I decided to use the NEW To The Stars stamp set that we featured on Monday. There is an outlined star stamp in that set. I mounted that to a small acrylic block and stamped my husband's as well as my own astrological signs on top of the Receding Background that I created earlier. This made the project start to look like stars spinning in outer space. It is a neat effect. I used the star to stamp out where the stars should be and connected the dots using a Ranger Clear embossing ink pen and a ruler. There is a line image included in the To The Stars stamp set, but I didn't not use it for this project.

I decided that it needed more stars to make it more interesting to look at. So, I broke out my Splat Box and began to go to town by ink splattering some interest. The paint I used to splatter was Gansai Tambi Starry Colors Gold no. 901 and Ranger White Acrylic Paint in Picket Fence. Then when that wasn't enough, I used Hero Arts White Iridescent Spray and Imagine Crafts Frost AND Sparkle Shimmer Spritz. This sucker is shiny!


I did manage to get a gigantic splat right in the center of my background, so I covered it up using hearts from various other Neat & Tangled coordinating die sets. Basic shapes like this heart can easily be used without its coordinating lined image. I think it helps hide my splat as well as give even more shine to the card. The largest heart is attached with Scotch 3M foam tape and the other two with Nuvo Deluxe Liquid Adhesive.

For the sentiment, I took the "I love you past the stars" stamp from the To The Stars stamp set also in this months release. I stamped it with Nuvo Clear Mark embossing ink onto a pre cut strip of Neenah 110 lb. Solar White cardstock cut with Neat & Tangled Skinny Strips die set. I used the widest die with a banner end. I cut it twice once for the stamped sentiment itself and once to use as banner ends. I just cut the second banner to leave two ends to tuck under the top strip to look more dimensional. The stamped sentiment was heat embossed using Hero Arts Gold embossing powder.  I popped it up using Scotch 3M foam tape.

The finished panel was cut down to 3 1/2 by 4 3/4 and popped up with white craft foam using Scrapbook.com double sided adhesive. I placed it onto a Stampin' Up! Speckled card base, which I love and I have a ton of it, but they don't sell it anymore. So, I can't link to it. But! It's basically a white cardstock with natural fibers showing in it color.

I hope you enjoyed my project today using the NEW Receding Background by Neat & Tangled. The release will go LIVE on Friday April 19th at 8am EST. (CLICK HERE!) to visit the Neat & Tangled Online Store or Blog to see more NEW Release inspiration.

Thank you for visiting my blog today.

Koren


Tuesday, April 16, 2019

Neat & Tangled April Release Week Day Two

Hello everyone.

Today is day two of Neat & Tangled's April release week. Today we are showcasing the NEW Dream Big stamp set. This set features an adorable little fairy, which matches closely with the NEW To The Stars stamp set we featured yesterday. It also has coordinating dies. I used some clouds from both sets because they are all the same, but different.

The release goes LIVE this Friday April 19th at 8:00 am EST!

To check out what the rest of the Design Team has come up with (CLICK HERE!) to visit the Neat & Tangled Blog and be inspired by all the Dream Big cards. I know that Cheiron has an awesome card (Insert wink emoji here, lol).


I started with a piece of Neenah 110 lb Solar White cardstock. I loaded the NEW Receding Background red rubber stamp (also by Neat & Tangled) into my We R Memory Keepers Precision Press. This is my new stamp positioner, it took me a minute to get on board here- it has been on the market a couple years- but so far I absolutely love it. I inked up the background stamp with Nuvo Clear Mark embossing powder and heat embossed it using Simon Says Stamp Clear embossing powder.

I used my Nuvo Blender Brushes to ink blend Distress Oxide ink in Tattered Rose, Wild Honey, and Abandoned Coral.  I concentrated on the darkest color being on the outside edges of the background working to a lighter color towards the middle. Blending the ink onto the background revealed the Receding Background and all of the interesting circles it provided. It reminds me of waves of heat, like coming from the sun. This panel was cut down to 3 1/2 by 4 3/4 and adhered to a Simon Says Stamp Fog card base using Scrapbook.com double sided adhesive and white craft foam.


The images from the Dream Big stamp set were stamped on Neenah 110 lb Solar White cardstock using Simon Says Stamp Intense Black ink. I used Copic Markers to color my images. I have created a Copic Color Map for you to see ALL of the colors I used to bring a little life to my images.

After using the coordinating dies to cut out my images, I popped them up using Scotch 3M Foam tape. Some were stuck on with Tombow Mono liquid adhesive.

The sentiment "Dream Big" is also from the Dream Big stamp set, go figure. I love this sentiment, and I always have. I love encouraging others to have big dreams. I really enjoy being part of a community that encourages everyone, not just children, to have lofty goals and help motivate them to reach them. I stamped this sentiment in Nuvo Clear Mark embossing powder onto Papertrey Ink's Winter Wisteria cardstock and heat embossed it with Ranger White embossing powder. I used the Fiskars Wire guide paper trimmer to trim it down. It too is popped up with Scotch 3M foam tape.


To finish off the card I added some NEW Enchanted sequins. This sequin pack is filled with lavender to purple sequins with different sizes of each. I used Micro Glue dots to adhere each one in place.

I hope you enjoy Day Two of Neat & Tangled's April Release. The Dream Big stamp set works seamlessly with the To the stars set that was showcased yesterday on Day one. Don't forget to comment on each of the Design Team members blogs for your chance to win a Dream Big stamp set to keep for yourself or gift to someone special. To enter the giveaway just comment on as many of the Design Team members blogs as possible. (CLICK HERE!) to go to the Neat & Tangled online store and blog. You will find links to all of the design team members blogs in todays post.

Thank you for visiting my blog today.

Koren


Monday, April 15, 2019

Neat & Tangled April Release Week Day One

 Hello everyone. 

It’s Neat and Tangled’s April Release Week. Today we are showcasing the NEW To The Stars stamp set. Make sure you (CLICK HERE!) to visit the Neat & Tangled blog for more inspiration from the rest of the design team. The NEW April release will go live on Friday at 8 AM. Make sure you comment across all of the blogs on the design team, for your chance to win a To The Stars stamp set of you very own.


I started my card project today using a piece of Spring Rain card stock. I then used Distress Oxide Ink, in Black Soot to add some clouds, using the MFT cloud stencil. I also added in some Chipped Sapphire, but not very much. This panel was cut to 3 1/2” x 4 and 3/4’’. 

I used my We R Memory Keepers Precision Press to align the sentiment “Hello Beautiful” and stamped it using Versafine Clair Nocturne Ink. To do this I, did have to cut the sentiment into two pieces. I do this all the time, you can easily go back to stamping this the way it was intended, by just the lining them back up next to each other. 


While having my stamping tool out, I stamped my images using Simon Says Stamp intense black ink. I also colored them using my Copic markers. Below, I have a Copic Color Map listing all of the markers that I used to color my images. 

The cloud panel was added to a Simon Says Stamp Fog card base. I used white craft foam and Scrapbook.com double-sided adhesive to do so. I then adhered the rest of the images using Tombow Mono liquid adhesive or Scotch 3M foam tape.  


To add some additional interest to my card, I added Unicorn Stickles to my fairy’s wings. I also stamped three of the stars from the same Neat & Tangled "To The Stars" stamp set using Nuvo Clear Mark embossing ink.  I wanted it to leave some tone on tone stars up at the top of the card, near the sentiment. This is hard to see in the photos. If I made this card again, I would use a darker ink in a similar blue shade, to make it stand out even more while still remaining subtle. 

I hope you liked my card project today featuring the NEW To The Stars stamp set from the Neat & Tangled April release. This release will go LIVE on Friday at 8am. 

Thank you for visiting my blog today. 

Koren 


Thursday, April 11, 2019

Simon Says Stamp Blossoms & Butterflies Release

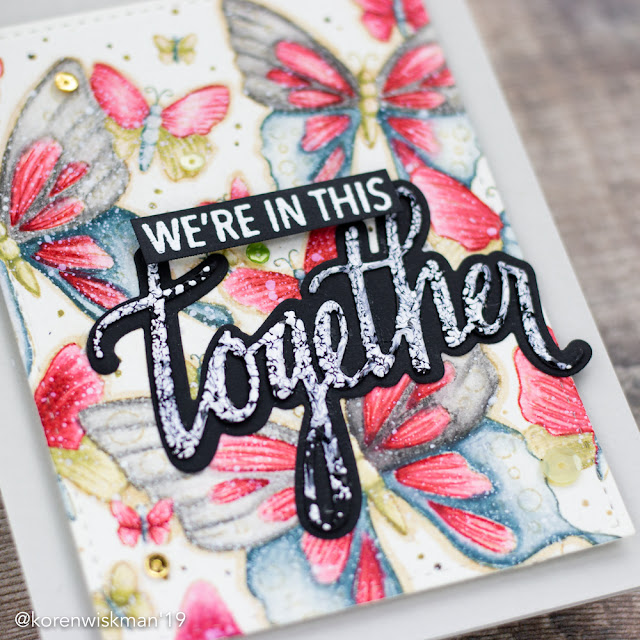
Hello Everyone. Today I have a slightly different card than what I normally create. I was inspired by Debi Hughes to hop out of my comfort zone a little bit and watercolor this NEW background stamp from Simon Says Stamp. This stamp is from the Blossoms & Butterflies Release. It is a red rubber cling mount stamp called Outlined Butterflies and it stamps like a dream.

To check out the rest of the release and find some inspiration (CLICK HERE!) to visit the Simon Says Stamp online store and blog.


I started my project with a piece of Arteza watercolor paper. This paper is more off-white than I would normally prefer, but for the antiqued look I was going for, it was perfect. I loaded my NEW Simon Says Stamp Outlined Butterflies background stamp into my original size MISTI.

I stamped the large background stamp using Distress Ink in Antique Linen as Debi frequently recommends. I stamped it twice to try to get the best outlined image I could. Using such a large stamp this is sometimes necessary to get a nice bold image.


Once my image was stamped and ready to color, I used my Distress Markers that I haven't used in a very long time, to color my background. I used Black Soot, Shabby Shutters, Barn Door, Stormy Sky, and Antique Linen. All of my markers seemed a bit dry and lonely from sitting around so long. I used my Stampin' Up! Blender Pen to blend out the Distress Markers. This is what I typically like to use. I start by adding the darkest color to the shadow areas and blend it into lighter areas using the same marker and blender pen combination. I will also sometimes steal color from the tip of the Distress Marker with the tip of the blender pen and blend color onto my project that way.

To finish off the watercoloring, I used the Antique Linen Distress Marker to go around the outside of the butterflies to give a little depth to the space between each butterfly. I also added color to the small dots already in the background using the same color markers that I used to color the image and blended them out using the same blender pen to give them a bit of a bokeh effect that is hardly noticeable in the photographs. I also loaded the entire background into my Splat Box and splattered the panel with some slightly watered down, Ranger Picket Fence White acrylic paint. I loaded an acrylic block with the paint and sprayed a little water into the mix. I used the Ranger Splatter tool to transfer the ink from the block to the card front.


I used the Neat & Tangled Together Stamp set and die set to create the sentiment on this project. I cut the "together" word die from Lawn Fawn Black Licorice cardstock. I used my Nuvo Clear Mark embossing ink to cover the entire front of the black die cut with sticky ink. I then coated it with Wow's "One Hundred and One" embossing powder, and heated it with my Wagner Heat Tool. I then adhered it to the shadow cut from the other die in the Together Die set by Neat & Tangled, using Elmers' spray adhesive. I took my die cut outside and laid it face down in order to spray plenty of adhesive onto the back.

I also added a few coordinating sequins using micro glue dots. I couldn't find the exact sequin pack that I used (which is Pretty Pink Posh Whimsical Forest), so below, I linked to a very similar set that I also could have used. Mostly I used the pale green and gold sequins.


The "we're in this" sentiment was stamped using the same sticky ink but this time I used Ranger's White embossing powder to heat emboss the sub sentiment. I cut it out with my Tonic Studios 9.5 inch shears, trying to leave a small black border around the letters. It was then popped up with Scotch 3M foam tape.

I want to thank you for coming to visit my blog today. There is a complete list of supplies below using affiliate links when possible. Don't forget to check out the Simon Says Stamp blog and online store for more Blossoms and Butterflies release inspiration. Use #blossomsandbutterlies to keep up with the latest postings.

Koren