Hello everyone.
Today is the Heffy Doodle and Chibitronics Blog Hop. I love it when we get to play with Chibi, it always challenges me creatively, and today is no exception. A full list of blog hop participants are listed below. We are using Heffy Doodle products along with a Chibitronics starter kit to create our projects for today's hop.
Don't forget to comment along the hop for your chance to win Prizes: Chibitonics Starter kit & £50 HeffyDoodle Gift Certificate. Giveaway closes May 4th 2019 Midnight EST. Two winners will be announced May 6th, 2019 on the Heffy Doodle Blog.
For more information on Chibitronics (CLICK HERE!)
For my project, I started with a piece of poster board that I was encouraged to buy from my friend Mary Polanco of Mary Polanco Designs. (CLICK HERE!) to visit her YouTube channel. I bought my two 18 x 24 inch poster board sheets from AC Moore. They were $1 dollar each and after I cut them down I had 15 card fronts that measured 4 1/4 by 5 1/2.
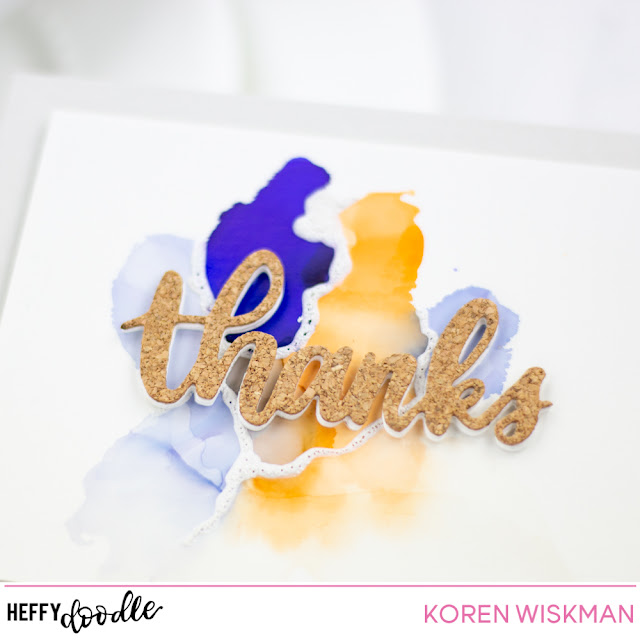
I'm sure you are asking me, why do I care? Well, one side of the poster board is semi-glossy and you can use your alcohol inks on it. I used Ranger Alcohol Inks in Amethyst, Peach Bellini, Gold Mixative, and Cool Peri, along with some Ranger Alcohol ink blending solution. I applied my inks in very small amounts, only using maybe two drops at any one time. Making sure that I move it around until the alcohol in dries in place. I started with the lightest inks first and made my way to the darkest of shades that I intended to use. If I didn't like how an area had blended together, I used the blending solution to thin out the color in that area. Always making sure to keep the inks moving until they stop dead in their tracks.
When adding the Gold Mixative I almost always add it along with blending solution. I just find that it looks better to me if I use it that way.
I made several panels using these shades. I absolutely loved how the inks looked on the poster board. I did make sure that I did not get the alcohol inks near the edge of the panel. I wanted to keep the edges of this design white and the inks, if used on the edges, will seep in-between the layers of the poster board and make the edges run unnecessarily. To avoid this I will always cut a slightly larger piece of poster board than what I intend to need. Although, I'm sure if you intend to saturate your panel with lots of ink, you might want to use regular Yupo paper, but this is a great option for any budget.
I took the most interesting of panels that I had made and chose it to be the background for today's card. I enjoyed how this one blended together. I also cut down the panel to 3 1/2 by 4 3/4.
To prepare the panel for the Chibitronics I ran it through my die cutting machine to cut two small holes that will eventually be under my alcohol ink "world" (I will explain why I did this below). I used the reinforcement hole die from the Heffy Doodle Tag Along Dies set. The alcohol ink "world" was cut using the Heffy Doodle Imperial Stitched Circles die set.
I also cut the smallest cloud from the Heffy Doodle Swirly Clouds die set. This cloud was cut from the same white poster board that I made the background from. I wanted the whites of the front of the card to match.
While I was die cutting I also cut the Heffy Doodle Heffy Cuts word die "thanks" from Die Cuts With A View's "Cork". This is a 6x6 paper pack that I have had in my stash for a very long time and I am so glad I do. I also cut the "thanks" word die from the same white poster board three additional times to create some layers to sit under the top cork layer. I used Nuvo Deluxe Adhesive to adhere these layers together.
I also took this opportunity to stamp inside of my card, and I used the sentiment "you light up my world" on the inside of a Simon Says Stamp Fog Card base. I stamped this sentiment using Versafine Clair Nocturne Ink. I love how this all came together.
I also used one of the other panels that I had created with the alcohol inks to make a second card. Even though it is really cool that the the first card lights up, I really like the simplicity of this second card.
To put the lighted card together I knew that I wanted to run things a little differently, so, I laid out my circuit onto a piece of cardstock, with the battery/switch in the lower right corner, where it felt natural for a thumb to depress the switch without seeking out a hidden location. I ran the copper tape along the cardstock, and then laid out my foam tape, around my circuitry. Remember those two holes in my inked background? Well, through those holes, I brought up the copper tape from the lower "level". I completed the circuit directly on the background, using both a blue and red LED to give me an intense purplish color. I then "capped" the lights with my planet, forcing the light outward from underneath its canopy.
The sentiment strip is also poster board stamped with a Heffy Doodle Freebie stamp that says "you are amazing". I stamped it with Nuvo Clear Mark Ink and heat embossed it with Hero Arts Gold embossing powder. I used my Heffy Doodle Strips of Ease die set to cut it out.
The second card was put together much easier. I just added my word die cut with Nuvo Deluxe adhesive to the alcohol inked panel. I popped up the panel itself and also added it to a Fog card base using white craft foam and Scrapbook.com double sided adhesive.
I placed a single white Doodlebug Shapped Sprinkle Tiny Heart on the top layer right above where the switch is located. This will indicate where to touch for the lights to come on.
When turned on the red and blue light combined make a purple hue to match the amethyst color in the card. I wish I had a rainbow of colors to light up a card. Everyone is always amazed at an interactive card but there is something to love about a clean and simple card as well.
I want to thank you for reading my blog today. Don't forget to comment along the hop for your chance to win.
Koren
Koren Wiskman ( You are here)


I love the mixed media look! I love the mixed media look!
ReplyDeleteThis card is beautiful! :)
ReplyDeleteI love your card. Using with the alchol backguround and light is really greate!!
ReplyDeleteAnd thank you for your sharing nice way to use the poster board with the alcohol inks. It is so nice!
I am not competitor with Giveaway. I'm Yukiko I, a DT of Chibitronics. But I want to leave may comment here because your card is so impressive.
Stunning colors
ReplyDeleteStunning colors
ReplyDeleteWow, it is so unexpected to have it light up. Very cool.
ReplyDeleteWhat a great idea how you did it with the lights Koren! Love it.
ReplyDeleteWow..so artsy and creative! Love how flawless and colourful it is!
ReplyDeleteLove your background Koren 💖
ReplyDeleteLove your color combo and that cute cloud! Beautiful card!
ReplyDeleteLove the other-worldly look of the
ReplyDeletecard when it is lit. great tip
on cutting down the poster board
to make the background panel.
thanks for sharing
txmlhl(at)yahoo(dot)com
Very cool. Love the added elements of the circle and cloud
ReplyDeleteGreat card, would never have thought of using the lights that way
ReplyDeleteLove your card! The lights are so cool!
ReplyDeletewow--this is so cool and the inside sentiment is perfect.
ReplyDeleteYour light up card is lovely!
ReplyDeleteWow, such an amazing card. Love the lighting and choice of colors. Thanks for the detailed writeup, it is helpful.
ReplyDeleteOh my- what a cool card!! I love the colors and the way it lights up!
ReplyDeletewow what an amazing card - thanks for the ideas:)
ReplyDeleteThis is OUTSTANDING Koren! OMG! SOOOOO COOL! I love that you did the Thanks out of cork!!!
ReplyDeleteWow! Wow! Wow! What a wonderful card and colouring!!! Love it!!!
ReplyDeleteFabulous colours, Koren, they go so beautifully together! And I love how clear your instructions and photos are!
ReplyDeleteMarisela Delgado said: Cute card. mariandmonsterd@yahoo.com
ReplyDeleteGreat card...I love the colors and the idea!
ReplyDeleteSuch a fun card, love the play of colors.
ReplyDeleteThis is stunning!
ReplyDeleteThanks for the detailed description of the holes technique - sounds like this is something I'm gonna have to try!
ReplyDeleteThese cards are fantastic!!!
ReplyDelete